ACL Guide
ACL stands for Access Control List. It defines the access permissions for an object.
The ACL mechanism used by LeanCloud grants the permission to perform each operation to specific users or roles, allowing only them to perform the operation.
For example:
{
  "*":{
    "read":true,
    "write":false
  },
  "role:admin":{
    "read":true,
    "write":true
  },
  "58113fbda0bb9f0061ddc869":{
    "read":true,
    "write":true
  }
}
- Everyone can read, but not everyone can write (
*means everyone). - Users with the admin role (including its sub-roles) can read and write.
- The user with the ID
58113fbda0bb9f0061ddc869can read and write.
We use the built-in _User table to maintain the account system and the _Role table to maintain roles.
Roles can contain users as well as other roles, meaning that roles can have hierarchies. Granting a permission to a role also grants the permission to the roles that belong to this role.
For each request sent to the cloud from the client, the cloud authenticates the user and performs checks on ACL. You can have the data in your app protected with the help of ACL.
Default ACL
Below is the default ACL value for all classes. It allows everyone to read and write:
{
  "*":{
    "read":true,
    "write":true
  }
}
When creating a new class on the dashboard, you can configure its default ACL in the dialog box:
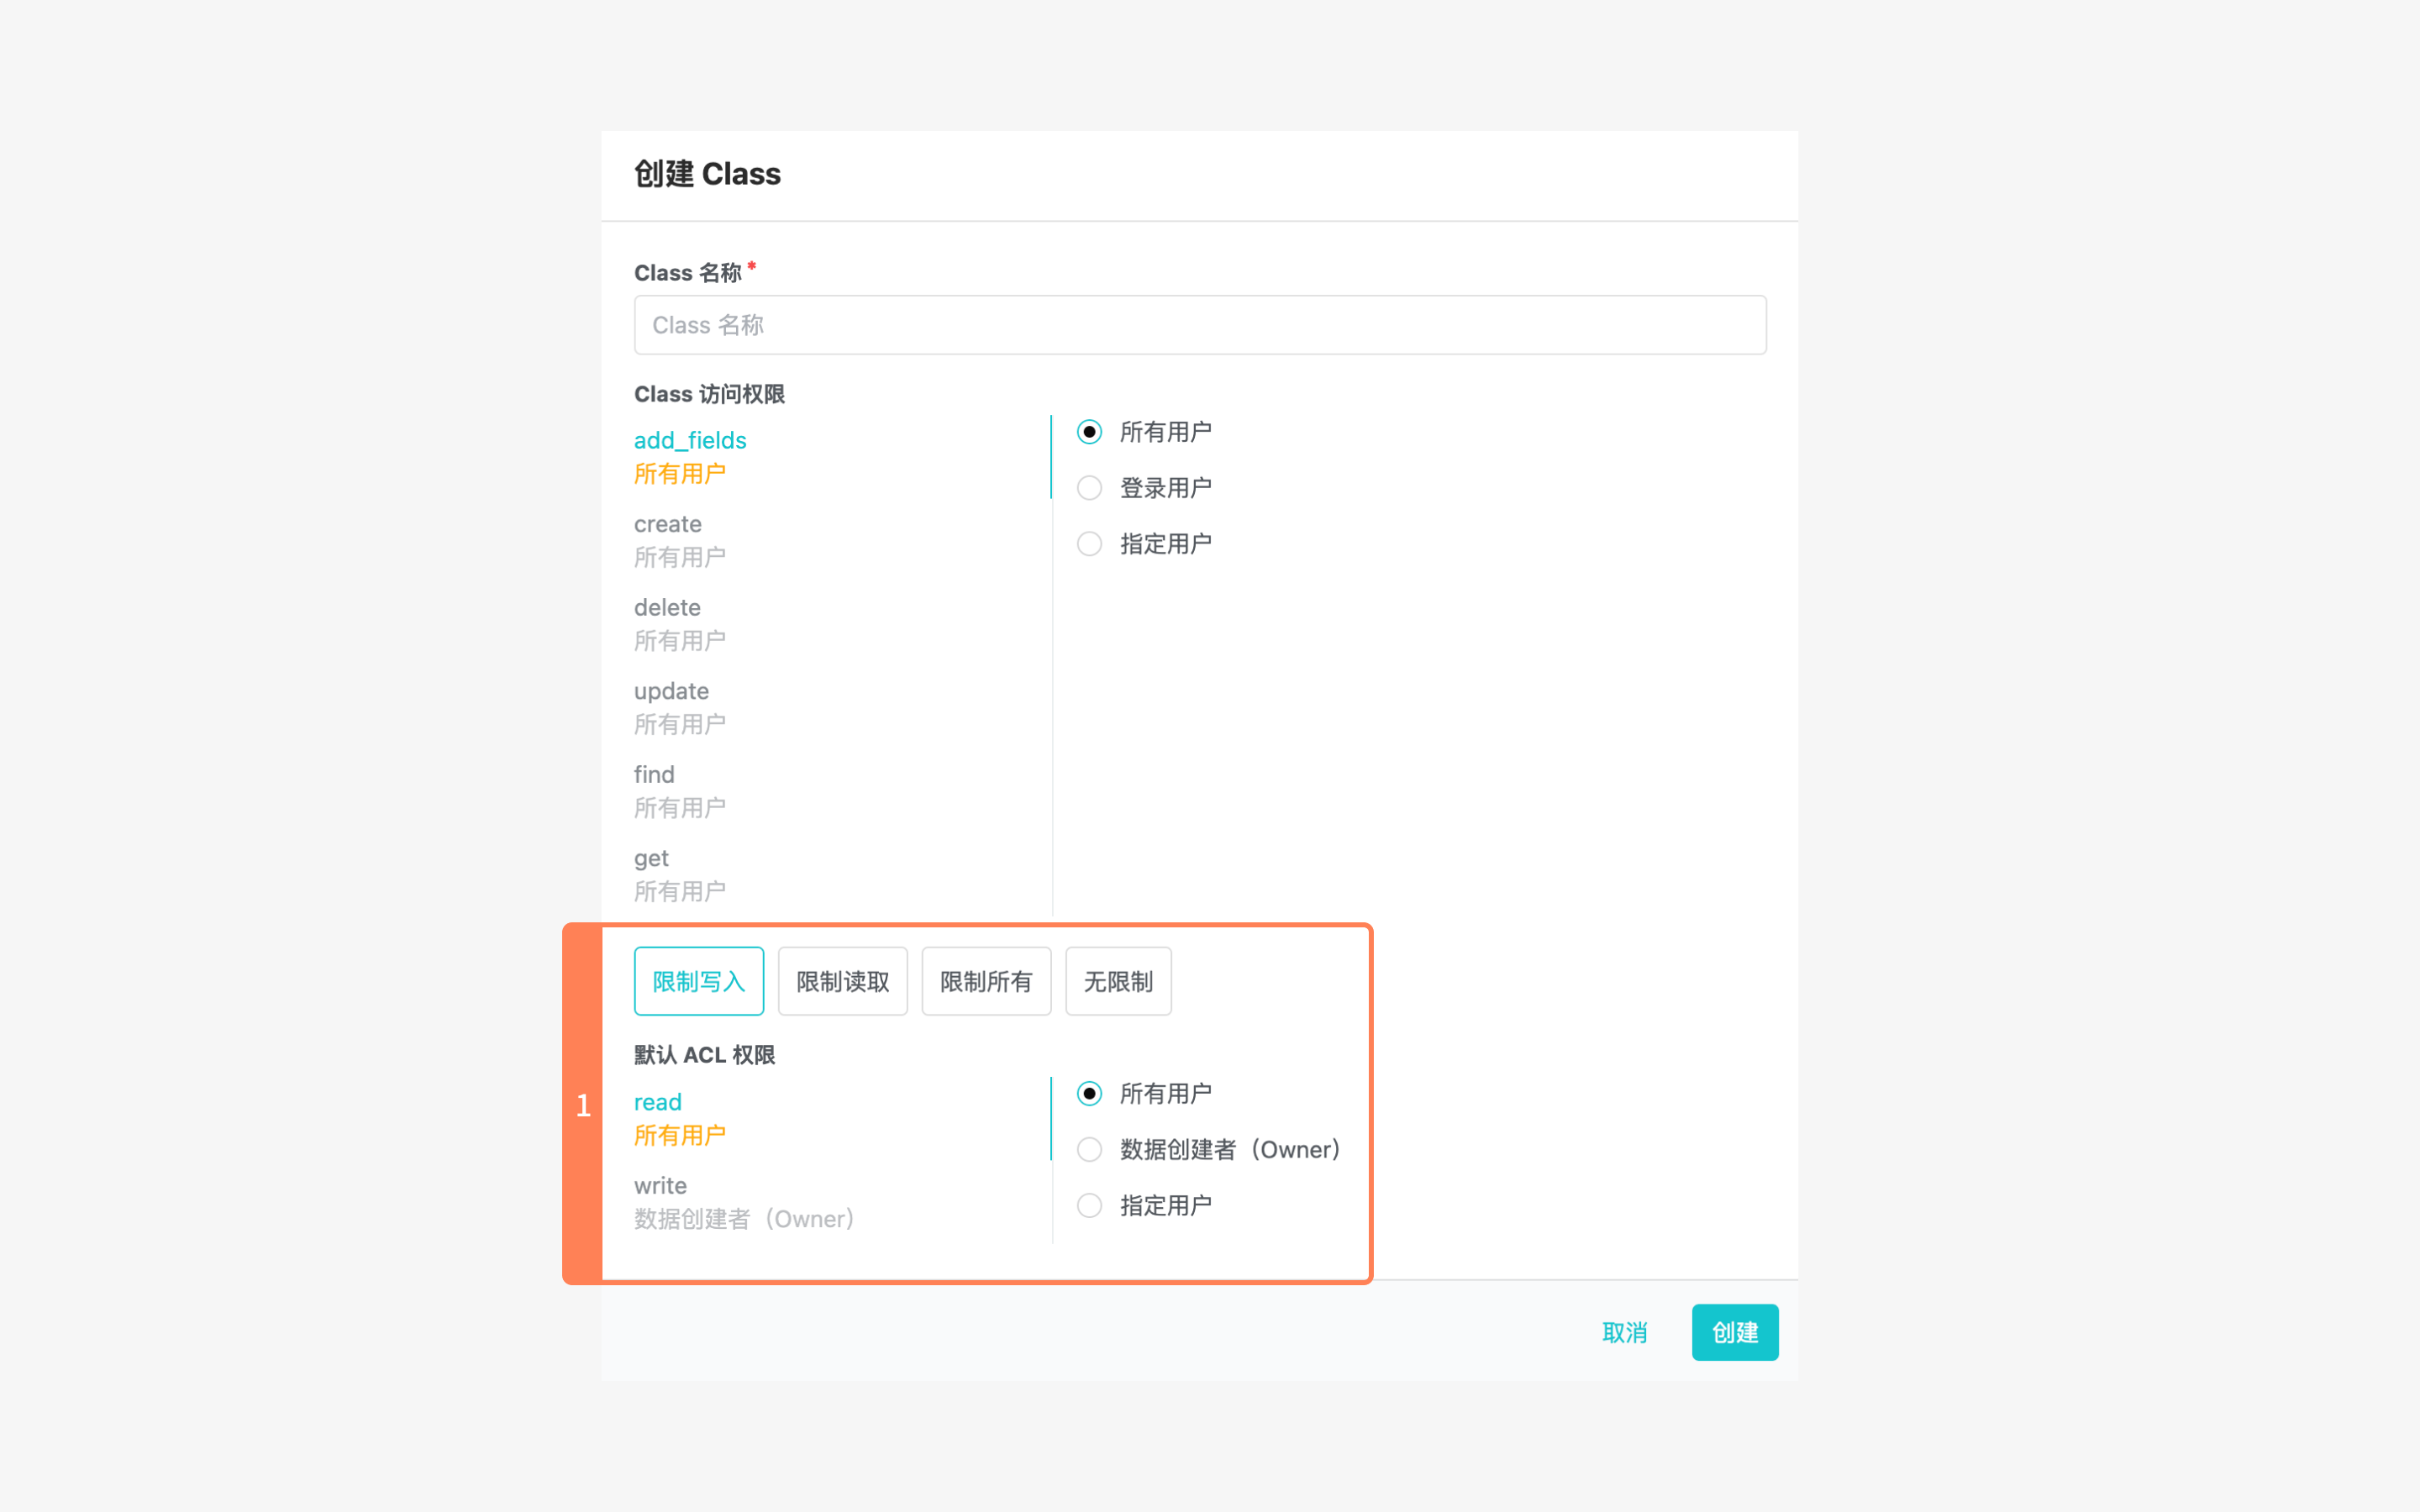
Here you can specify which users you want to open read and write permissions for:
- See Data Security for more information about "All users" and "Designated users".
- "Object creator (owner)" refers to the user who creates the data. In other words, it is the user that the
X-LC-SessionHTTP header used when creating the object corresponds to.
In addition to specifying which users are allowed to read and write, the dialog also provides some shortcuts for common settings:
- Restrict write: The creator can read and write; other users can read but not write.
- Restrict read: The creator can read and write; other users cannot read or write.
- Restrict all: The creator can read but not write; other users cannot read or write.
- No restrictions: Everyone can read and write.
For an existing class, you can update the default ACL and access permissions. Go to Dashboard > Data Storage > Data, select a class, and click the Permission tab. However, changing the default ACL only affects new objects; the ACL values of existing objects remain unchanged.
In addition to setting the default ACL, you can also set the ACL for individual objects in the console.
However, it is not practical to manually set ACLs for each object in the console, as it is too tedious.
So we typically set the default ACL in the console to ensure that all newly created objects have the appropriate initial ACL values.
To set more complex and granular ACLs for individual objects, set their ACL fields by code.
For example, the default ACL for a Post class might look like this
- read: all users
- write: creator (owner)
This means that all users can view posts, and users can only edit or delete their own posts.
Here, the data creator is the user corresponding to the session token carried in the HTTP header of the request that created the object, in our case the author of the post.
ACL with Users
Let's continue with the example above. Suppose you want to also allow a coauthor to modify a post:
- .NET
- Java
- Objective-C
- Swift
- Flutter
- JavaScript
- Python
- PHP
- Go
try {
  LCQuery<LCUser> userQuery = LCUser.GetQuery();
  LCUser otherUser = await userQuery.Get("55f1572460b2ce30e8b7afde");
  // Create a post object
  LCObject post = LCObject("Post");
  post["title"] = "This is my second post.";
  post["content"] = "I started watching soccer and basketball.";

  //Create a new ACL instance
  LCACL acl = new LCACL();
  acl.PublicReadAccess = true; // Set read access to public so that anyone can read
  LCUser currentUser = await LCUser.GetCurrent();
  acl.SetUserWriteAccess(currentUser, true); // Set write access to the current user so that only the current user can update this post
  acl.SetUserWriteAccess(otherUser, true);
  post.ACL = acl;

  await post.Save();
} catch (LCException e) {
  print($"{e.Code} : {e.Message}");
}
LCQuery<LCUser> query = LCUser.getQuery();
query.getInBackground("55f1572460b2ce30e8b7afde").subscribe(new Observer<LCUser>() {
    @Override
    public void onSubscribe(Disposable d) {
    }
    @Override
    public void onNext(LCUser anotherUser) {
        // Create a post object
        LCObject post= new LCObject("Post");
        post.put("title","This is my second post.");
        post.put("content","I started watching soccer and basketball.");

        //Create a new ACL instance
        LCACL acl = new LCACL();
        acl.setPublicReadAccess(true);// Set read access to public so that anyone can read
        acl.setWriteAccess(LCUser.getCurrentUser(), true);//Set write access to the current user
        acl.setWriteAccess(anotherUser, true);

        // Assign the ACL instance to the post object
        post.setACL(acl);

        //Save the object to the cloud
        post.saveInBackground();
    }
    @Override
    public void onError(Throwable e) {
        System.out.println("errorMessage:" + e.getMessage());
    }
    @Override
    public void onComplete() {
    }
}
LCQuery *query = [LCUser query];
[query getObjectInBackgroundWithId:@"55f1572460b2ce30e8b7afde" block:^(LCObject * _Nullable object, NSError * _Nullable error) {
    if (error == nil) {
        // Create a post object
        LCObject *post = [LCObject objectWithClassName:@"Post"];
        [post setObject:@"This is my second post." forKey:@"title"];
        [post setObject:@"I started watching soccer and basketball." forKey:@"content"];

        //Create a new ACL instance
        LCACL *acl = [LCACL ACL];
        [acl setPublicReadAccess:YES];// Set read access to public so that anyone can read
        [acl setWriteAccess:YES forUser:[LCUser currentUser]];// Set write access to the current user
        [acl setWriteAccess:YES forUser:otherUser];

        post.ACL = acl;// Assign the ACL instance to the post object

        [post save];
    } else {
        NSLog(@"error");
    }
}];
let query = LCQuery(className: LCUser.objectClassName())

_ = query.get("55f1572460b2ce30e8b7afde") { result in
    switch result {
    case .success(object: let object):
        do {
            let post = LCObject(className: "Post")

            try post.set("title", value: "This is my second post.")
            try post.set("content", value: "I started watching soccer and basketball.")

            let acl = LCACL()

            acl.setAccess([.read], allowed: true)
            if let currentUserID = LCApplication.default.currentUser?.objectId?.value {
                acl.setAccess([.write], allowed: true, forUserID: currentUserID)
            }
            if let anotherUserID = (object as? LCUser)?.objectId?.value {
                acl.setAccess([.write], allowed: true, forUserID: anotherUserID)
            }

            post.ACL = acl

            assert(post.save().isSuccess)
        } catch {
            print(error)
        }
    case .failure(error: let error):
        print(error)
    }
}
try {
  LCQuery<LCUser> userQuery = LCUser.getQuery();
  LCUser otherUser = await userQuery.get('55f1572460b2ce30e8b7afde');
  // Create a post object
  LCObject post = LCObject("Post");
  post['title'] = 'This is my second post.';
  post['content'] = 'I started watching soccer and basketball.';

  //Create a new ACL instance
  LCACL acl = LCACL();
  acl.setPublicReadAccess(true); // Set read access to public so that anyone can read
  LCUser currentUser = await LCUser.getCurrent();
  acl.setUserWriteAccess(currentUser, true); // Set write access to the current user so that only the current user can update this post
  acl.setUserWriteAccess(otherUser, true);
  post.acl = acl; //Assign the ACL instance to the post object

  await post.save();
} on LCException catch (e) {
  print('${e.code} : ${e.message}');
}
  // Create a query for User
  var query = new AV.Query(AV.User);
  query.get('55f1572460b2ce30e8b7afde').then(function(otherUser) {
    var post = new AV.Object('Post');
    post.set('title', 'This is my second post.');
    post.set('content','I started watching soccer and basketball.');

    // Create a new ACL instance
    var acl = new AV.ACL();
    acl.setPublicReadAccess(true);
    acl.setWriteAccess(AV.User.current(), true);
    acl.setWriteAccess(otherUser, true);

    // Assign the ACL instance to the post object
    post.setACL(acl);

    // Save the object to the cloud
    return post.save();
  }).then(function() {
    // Saved
  }).catch(function(error) {
    // Error
    console.log(error);
  });
import leancloud

# Log in a user
user = leancloud.User()
user.login('my_user_name', 'my_password')

# Create a Post object
Post = leancloud.Object.extend('Post')
post = Post()
post.set('title', 'This is my second post.')
post.set('content', 'I started watching soccer and basketball.')

# Create a leancloud.ACL instance
acl = leancloud.ACL()
acl.set_public_read_access(True)
# Set write permission for the currently logged in user
acl.set_write_access(leancloud.User.get_current().id, True)
# Set write permission for the user with a given objectId
acl.set_write_access('55f1572460b2ce30e8b7afde', True)
post.set_acl(acl)
post.save()
// Log in a user
User::logIn("Tom", "cat!@#123");

// Create a post
$post = new LeanObject("Post");
$post->set("title", "This is my second post.");
$post->set("content", "I started watching soccer and basketball.");

// Create a new ACL instance
$acl = new ACL();
// Set read access to public so that anyone can read
$acl->setPublicReadAccess(true);
// Set write access to the current user so that only the current user can update this post
$acl->setWriteAccess(User::getCurrentUser(), true);
$otherUser = LeanObject::create("_User", "55f1572460b2ce30e8b7afde");
$acl->setWriteAccess($otherUser, true);
$post->setACL($acl);
$post->save();
Go back to the dashboard after running the above code and you will see that the ACL of the post will be:
{
  "*":{
    "read":true
  },
  "55b9df0400b0f6d7efaa8801":{
    "write":true
  },
  "55f1572460b2ce30e8b7afde":{
    "write":true
  }
}
As you can see from the result, the post now allows the two users with objectId of 55b9df0400b0f6d7efaa8801 and 55f1572460b2ce30e8b7afde to update. They have the write permission "write": ture.
In order to avoid long and unfocused examples, the following examples do not give the complete code that can be executed directly, but only the key parts.
Assuming the forum has an administrator who can edit and delete all posts, we can add the appropriate permissions to each post in a similar way:
- .NET
- Java
- Objective-C
- Swift
- Flutter
- JavaScript
- Python
- PHP
- Go
acl.SetUserWriteAccess(anAdministrator, true);
acl.setWriteAccess(anAdministrator, true);
[acl setWriteAccess:YES forUser:anAdministrator];
acl.setAccess([.write], allowed: true, forUserID: anAdministratorID)
acl.setUserWriteAccess(anAdministrator, true);
acl.setWriteAccess(anAdministrator, true);
acl.set_write_access(an_administrator_id, True)
$acl->setReadAccess($anAdministrator, true);
However, new administrators may join and old ones may leave in the future, so it is too inflexible to manage permissions based on users only, and any personnel changes require bulk data revisions (modification of ACL fields).
Therefore, we need to introduce the concept of roles.
ACL with Roles
A role is a group of users, and roles can be nested. In other words, the member of a role is either a user or another role.
Each role has an immutable and unique name, consisting of alphanumerics and underscores.
Continuing the example above, let's see how to grant write permission to the administrator role (assuming there is an existing role named admin):
- .NET
- Java
- Objective-C
- Swift
- Flutter
- JavaScript
- Python
- PHP
- Go
LCRole admin = LCRole.CreateWithoutData("_Role", "55fc0eb700b039e44440016c");
acl.SetRoleReadAccess(admin, true);
acl.setRoleWriteAccess("admin", true);
LCRole *admin = [LCRole objectWithClassName:@"_Role" objectId:@"55fc0eb700b039e44440016c"];
[acl setWriteAccess:YES  forRole:admin];
acl.setAccess([.write], allowed: true, forRoleName:"admin")
LCRole admin = LCRole.createWithoutData('_Role', '55fc0eb700b039e44440016c');
acl.setRoleWriteAccess(admin, true);
acl.setRoleWriteAccess('admin', true);
admin = leancloud.Role('admin')
acl.set_role_write_access(admin, True)
$acl->setRoleWriteAccess("admin", true);
Role Creation
Let's see how to create a role.
Note that since a Role itself is also an Object, it has its own ACL control, and it should have tighter permission control.
So usually when we create a role, we explicitly set the ACL for that role.
If you don't specify it, then the SDK will set the ACL of the role to be readable by all and unwritable by all by default.
In other words, without explicitly specifying the ACL, the SDK's default setting makes it impossible to modify the role on the client side once it is created, and future operations such as adding members must be done on the console or on the server side using masterKey.
For testing purposes, the following sample code temporarily assigns write access to the user who created the role (the current user). Please set the appropriate ACL according to your specific needs in the actual project.
- .NET
- Java
- Objective-C
- Swift
- Flutter
- JavaScript
- Python
- PHP
- Go
try {
  // The ACL of the role
  LCACL acl = new LCACL();
  acl.PublicReadAccess = true;
  LCUser currentUser = await LCUser.GetCurrent();
  acl.SetUserWriteAccess(currentUser, true);

  LCRole admin = LCRole.Create(name, acl);
  await admin.Save();
} catch (LCException e) {
  print($"{e.Code} : {e.Message}");
}
// The ACL of the role
LCACL roleACL = new LCACL();
roleACL.setPublicReadAccess(true);
roleACL.setWriteAccess(LCUser.getCurrentUser(),true);

LCRole admin = new LCRole("admin", roleACL);
admin.saveInBackground().blockingSubscribe();
// The ACL of the role
LCACL *roleACL = [LCACL ACL];
[roleACL setPublicReadAccess:YES];
[roleACL setWriteAccess:YES forUser:[LCUser currentUser]];

LCRole *admin = [LCRole roleWithName:@"admin" acl:roleACL];
[admin save];
do {
  // The ACL of the role
  let roleACL = LCACL()
  roleACL.setAccess([.read], allowed: true)
  if let currentUserID = LCApplication.default.currentUser?.objectId?.value {
    roleACL.setAccess([.write], allowed: true, forUserID: currentUserID)
  }

  let admin = LCRole(name: "admin")
  admin.ACL = roleACL
  assert(admin.save().isSuccess)
} catch {
  print(error)
}
try {
  // The ACL of the role
  LCACL acl = LCACL();
  acl.setPublicReadAccess(true);
  LCUser currentUser = await LCUser.getCurrent();
  acl.setUserWriteAccess(currentUser, true);

  LCRole admin = LCRole.create('admin', acl);
  await admin.save();
} on LCException catch (e) {
  print('${e.code} : ${e.message}');
}
// The ACL of the role
const roleAcl = new AV.ACL();
roleAcl.setPublicReadAccess(true);
roleAcl.setWriteAccess(AV.User.current(), true);

const admin = new AV.Role('admin', roleAcl);
await admin.save();
# The ACL of the role
role_acl = leancloud.ACL()
role_acl.set_public_read_access(True)
current_user_id = leancloud.User.get_current().id
role_acl.set_write_access(current_user_id)

admin = leancloud.Role('admin', role_acl)
admin.save()
// The ACL of the role
$roleACL = new ACL();
$roleACL->setPublicReadAccess(true);
$roleACL->setWriteAccess(User::getCurrentUser(), true);

$admin = new Role();
$admin->setName("admin");
$admin->setACL($roleACL)
$admin->save();
Now the admin role is empty. Let's add the current user to this role:
- .NET
- Java
- Objective-C
- Swift
- Flutter
- JavaScript
- Python
- PHP
- Go
LCUser currentUser = await LCUser.GetCurrent();
admin.AddRelation("users", currentUser);
admin.getUsers().add(LCUser.getCurrentUser());
[[admin users] addObject: [LCUser currentUser]];
if let currentUser = LCApplication.default.currentUser {
    if let users = admin.users {
        try? users.insert(currentUser)
    } else {
        let users = admin.relationForKey("users")
        if (try? users.insert(currentUser)) != nil {
          admin.users = users
        }
    }
}
LCUser currentUser = await LCUser.getCurrent();
admin.addRelation('users', currentUser);
admin.getUsers().add(AV.User.current());
admin.get_users().add(leancloud.User.get_current())
$admin->getUsers().add(User::getCurrentUser());
To remove a user from the role:
- .NET
- Java
- Objective-C
- Swift
- Flutter
- JavaScript
- Python
- PHP
- Go
LCUser currentUser = await LCUser.GetCurrent();
admin.RemoveRelation("users", currentUser);
admin.getUsers().remove(LCUser.getCurrentUser());
[[admin users] removeObject:[LCUser currentUser]];
if let currentUser = LCApplication.default.currentUser {
  try? admin.users?.remove(currentUser)
}
LCUser currentUser = await LCUser.getCurrent();
admin.removeRelation('users', currentUser);
admin.getUsers().remove(AV.User.current());
admin.get_users().remove(leancloud.User.get_current())
$admin->getUsers().remove(User::getCurrentUser());
As mentioned earlier, the member of a role can be another role.
Suppose there are two roles, an admin and a moderator', and we want adminto be a child ofmoderator`, since the administrator also has all the privileges of the moderator.
- .NET
- Java
- Objective-C
- Swift
- Flutter
- JavaScript
- Python
- PHP
- Go
moderator.AddRelation("roles", admin);
moderator.getRoles().add(admin);
[[moderator roles] addObject:admin];
if let subroles = moderator.roles {
  try? subroles.insert(admin)
} else {
  let subroles = moderator.relationForKey("roles")
  if (try? subroles.insert(currentUser)) != nil {
    admin.roles = subroles
  }
}
moderator.addRelation('roles', admin);
moderator.getRoles().add(admin);
moderator.get_roles().add(admin)
$moderator->getRoles().add(admin);
Occasionally you may want to remove subroles. For example, we later changed our minds and decided that admins should focus on global administrative tasks, and that editing, deleting, and the like should be the responsibility of moderators.
- .NET
- Java
- Objective-C
- Swift
- Flutter
- JavaScript
- Python
- PHP
- Go
moderator.RemoveRelation("roles", admin);
moderator.getRoles().remove(admin);
[[moderator roles] removeObject:admin];
try? moderator.roles?.remove(admin)
moderator.removeRelation('roles', admin);
moderator.getRoles().remove(admin);
moderator.get_roles().remove(admin)
$moderator->getRoles().remove(admin);
Role Query
Query which roles a user has:
- .NET
- Java
- Objective-C
- Swift
- Flutter
- JavaScript
- Python
- PHP
- Go
try {
  LCUser currentUser = await LCUser.GetCurrent();
  LCQuery roleQuery = LCRole.GetQuery();
  roleQuery.WhereEqualTo("users", currentUser);
  ReadOnlyCollection<LCRole> roles = await roleQuery.Find();
} catch (LCException e) {
  print($"{e.Code} : {e.Message}");
}
LCUser user = LCUser.getCurrentUser();
user.getRolesInBackground().subscribe(new Observer<List<LCRole>>() {
    @Override public void onSubscribe(Disposable d) {}
    @Override public void onNext(List<LCRole> avRoles) {
        // avRoles is the result
    }
    @Override public void onError(Throwable e) {}
    @Override public void onComplete() {}
});
LCUser *user = [LCUser currentUser];
[user getRolesInBackgroundWithBlock:^(NSArray<LCRole *> * _Nullable avRoles, NSError * _Nullable error) {
  // avRoles is the result
}];
if let user = LCApplication.default.currentUser {
    let roleQuery = LCQuery(className: LCRole.objectClassName())
    roleQuery.whereKey("users", .equalTo(user))
    _ = roleQuery.find { result in
        switch result {
        case .success(objects: let roles):
            print(roles)
        case .failure(error: let error):
            print(error)
        }
    }
}
try {
  LCUser currentUser = await LCUser.getCurrent();
  LCQuery roleQuery = LCRole.getQuery();
  roleQuery.whereEqualTo('users', currentUser);
  List<LCRole> roles = await roleQuery.find();
} on LCException catch (e) {
  print('${e.code} : ${e.message}');
}
const roles = await AV.User.current().getRoles();
roles = leancloud.User.get_current().get_roles()
$roles = User::getCurrentUser().getRoles();
To query the users included in a role (only the code to build the query is given here):
- .NET
- Java
- Objective-C
- Swift
- Flutter
- JavaScript
- Python
- PHP
- Go
LCQuery<LCUser> userQuery = moderator.Users.Query;
LCQuery<LCUser> userQuery = moderator.getUsers().getQuery();
LCUser *userQuery = [[moderator users] query];
let *userQuery = moderator.users?.query
LCQuery userQuery = moderator.users.query();
const userQuery = moderator.getUsers().query();
user_query = moderator.get_users().query
$userQuery = $moderator->getUsers().getQuery();
Of course, the above code does not take into account the users contained in the subroles. If you want to query all of the users contained in a role (both directly and indirectly), you need to recursively look up all of the role's subroles (including subroles of subroles, and so on), and then query all of the users contained in those roles. For brevity, we won't include the full code here, just the code to build the subrole query:
- .NET
- Java
- Objective-C
- Swift
- Flutter
- JavaScript
- Python
- PHP
- Go
LCQuery<LCRole> subroleQuery = moderator.Roles.Query;
LCQuery<LCRole> subroleQuery = moderator.getRoles().getQuery();
LCRole *subroleQuery = [[moderator roles] query];
let *subRoleQuery = moderator.roles?.query
LCQuery subroleQuery = moderator.roles.query();
const subroleQuery = moderator.getRoles().query();
subrole_query = moderator.get_roles().query
$subRoleQuery = $moderator->getRoles().getQuery();
Because roles inherit from structured stored objects, you can also perform various queries based on other properties of the role, just as you can with general object queries.
Special Rules
Because user-related information is sensitive, the _User table ignores ACL settings and no user can change the properties of other users. For example, if the currently logged in user is A, and A wants to change the username, password, or other custom properties of user B via a query, it won't work, even if user B has write access to A in their ACL.
LiveQuery is designed to be used on the client side, and the client side should not use MasterKey, otherwise there will be big security risks. Therefore, the MasterKey is ignored when subscribing to events with LiveQuery. In other words, LiveQuery should not use the MasterKey when subscribing to events, and even if it does, it won't skip permission checks like ACLs.
Retrieving ACL Value
When retrieving data, the SDK does not return the ACL value of the object by default. If you want to get the ACL value when fetching an object, the following two conditions must be met:
- Go to Dashboard > Data Storage > Settings > Queries and select "Include ACL with objects being queried".
- The client specifies that the ACL should be returned when the object is retrieved.
The code is as follows:
- .NET
- Java
- Objective-C
- Swift
- Flutter
- JavaScript
- Python
- PHP
- Go
LCQuery<LCObject> query = new LCQuery<LCObject>("Todo");
query.IncludeACL = true;
LCQuery<LCObject> query = new LCQuery<>("Todo");
query.includeACL(true);
LCQuery *query = [LCQuery queryWithClassName:@"Todo"];
query.includeACL = YES;
let query = LCQuery(className: "Todo")
query.includeACL = true
LCQuery<LCObject> query = LCQuery('Todo');
query.includeACL(true);
var query = new AV.Query('Todo');
query.includeACL(true);
query = leancloud.Object.extend('Todo').query.include_acl(True)
// Not yet supported
Best Practice
If the application's permission control needs are relatively simple, we recommend setting class permissions, field permissions, and default ACL correctly, and then setting individual ACLs that require fine-grained permission control through client-side code.
For applications with complex permission control requirements, we recommend setting class permissions, field permissions, and default ACLs in the console, and then unifying the ACL-related logic in the Cloud Engine. On the one hand, this eliminates the need to constantly update and maintain client-side code with very similar logic across iOS, Android, Web, and so on. On the other hand, in addition to handling ACLs, the Cloud Engine can also control permissions through hooks based on more complex conditions, such as not allowing posts that exceed a certain number of words. See 在云引擎中使用 ACL for more details.
For classes that store very sensitive data and have high security requirements, you may also want to consider turning off write and even read permissions in the class permissions and route all client requests through the Cloud Engine, giving you the same security guarantee as building your own backend.