Data Security
As a secure serverless platform you can count on, TDS takes data security seriously. All API requests sent to TDS are encrypted by SSL and strictly verified for authentication and authorization.
Authentication
On the client side, accessing the API requires the AppID and the AppKey of the application. Requests from trusted environments such as Cloud Engine or your own servers can use the AppID and the MasterKey instead. The Android SDK supports an additional authentication mechanism using the AppID only.
Using MasterKey to access the API skips all access controls, so make sure your MasterKey is never leaked.
When accessing the API from the client side, the following security measures are applied:
- All connections between the client side and the server side are HTTPS-encrypted.
- When accessing the API through an SDK, the SDK will not include the AppKey in the HTTP header, but a signature string generated by the client based on the AppKey and the request initiation time. You can also use this approach when sending requests to our REST API directly without SDKs.
HTTPS-encrypted communications can avoid leaking data and the AppKey to attackers in the middle. However, it does not prevent an attacker from intercepting the transmission at the client side. Verification signature string can avoid leaking AppKey during transmission, but does not prevent an attacker from acquiring the AppKey via reverse-compiling the application package. The Android SDK supports authentication with the AppID only. A closed source native library shipped with the Android SDK will sign the requests automatically based on the application certificate provided by you. This avoids exposing the AppKey of the application and significantly increases the difficulties of reverse engineering. However, to fully ensure data security, you still need to utilize access control settings to restrict data access.
Authorization
You can configure access permissions at three different levels:
- Class (table)
- Field (column)
- Object (record)
Class
You can configure access permissions for the entire class/table on the dashboard.
When creating a new class on the dashboard, you can configure its access permissions in the dialog box.
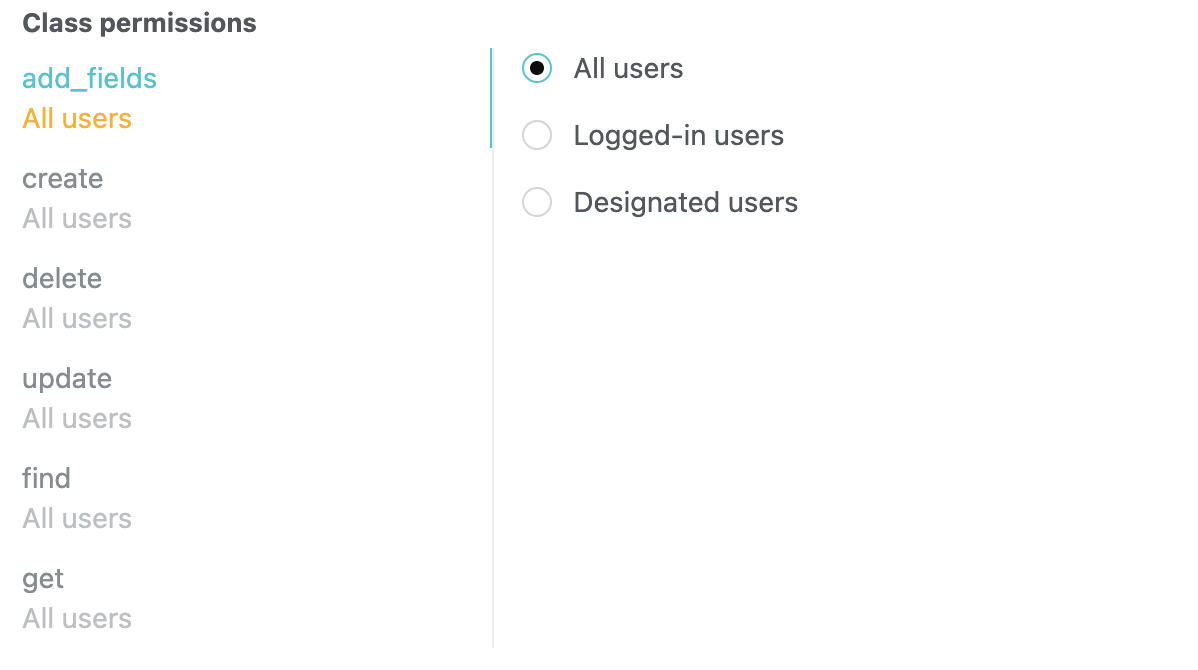
add_fields: When saving an object, if it contains non-existent fields, this option determines whether they can be created automatically. If you have created all the fields needed on the dashboard, you’d better disallow anyone to add fields.create: This option determines whether a new object can be saved. For example, you can only allow registered users or specific users to create a new object.delete: This option determines whether deleting an object is allowed.update: This option determines whether updating an existing object is allowed.find: This option determines whether querying objects according to specific conditions is allowed. If you disallow this, you can only retrieve an object with its objectId (assuming thegetpermission is allowed).get: This option determines whether retrieving an object with its objectId is allowed.
You can assign each permission to different users:
- All users: Here “users” refer to clients, not users in the built-in user system of TDS Authentication. In other words, all requests, including those without a session token or with an invalid session token, are permitted.
- Logged-in users: Only requests with a valid session token are permitted.
- Designated users: Only requests with a session token belonging to certain users are permitted. You can specify these users by filling in their usernames, the
objectIds of them, the names of the roles they have, or theobjectIds of these roles. If you don’t provide any users or roles, no one will get the permission.
Here is an example: if we have an app that allows users to make posts anonymously, but only those reviewed by the admin can be publicly displayed, we can create two tables for the purpose. The first table stores all the unreviewed posts with its create permission given to all users. The second table stores reviewed posts with its create permission given to admins only.
After a class has been created, you can still modify its permission settings. To do so, simply go to Dashboard > Data Storage > Data, select the class, and click the Permission tab.
Field
You can also configure the access permissions of each field. To do so, go to Dashboard > Data Storage > Data, select a class, click the dropdown arrow of a field, and select Edit.
- Read only: This option determines whether the client side is allowed to update this field.
- Hide from clients: This option determines whether this field is included in the result returned to the client side. For example, a pseudo-anonymous application may still store the author of each post, but it is invisible to the client side.
Object
Every object has a special ACL field. ACL, a.k.a. Access Control List, allows for specifying access permission of a certain object. This is the finest level of access permission control.
Please refer to The ACL Guide for details.
Security Settings
You can configure security settings on Dashboard > Settings > Security. By turning off the services you don’t use, you can prevent the resources in your app from being abused by those who have stolen your AppId and AppKey.
You can find the switches of some sub-services on the corresponding settings pages. For example:
You can turn on/off LiveQuery by going to Dashboard > Data Storage > Settings > Security.
For security reasons, you man only want your app to send push notifications to users from the server side. There is an option under Dashboard > Push Notification > Settings called Prevent clients from sending push notifications. When this option is enabled, you can only send push notifications by accessing the REST API with the MasterKey or by going to Dashboard > Push Notification > Send notifications.
Dashboard > SMS > Settings > Enable SMS verification code: When this option is disabled, you can only invoke requestSmsCode with MasterKey. Be aware that user-related short messages are not controlled by this option. When this option is disabled, the client-side can still invoke SMS interfaces related to users.
You can disallow clients to create classes by going to Dashboard > Data Storage > Settings > Security and enabling Disallow clients to create classes. If you prefer to design the data structure of your application beforehand, it is recommended that you tick this option and create all the classes needed on the dashboard. If you prefer to dive in directly and refine the data structure during the development of your application’s prototype, it is recommended that you do not tick this option during the initial development stage, and tick this option before deploying your application to production.
There is an option under Dashboard > Data Storage > Settings > Queries called Check ACL when querying included Pointer data. This option is enabled by default. It is recommended that all applications keep this option enabled.
There are some user-related security settings under Dashboard > Authentication > Settings. Here you can choose whether to require a user to provide their old password when setting a new password, whether to log out a user when their password is updated, and whether to validate the access token when a user logs in with a third-party account.
You can specify the types of files users can upload by going to Dashboard > Data Storage > Files > Settings.
Web Secure Domains
Web secure domains can be used to restrict request origins, preventing others from abusing the resources of your servers.
The web secure domains should be configured following the domain security policies of the browsers. Subdomains need to be listed explicitly and wildcards are not supported. Protocols and port numbers must match exactly (you can omit the port number if the default one is used; for example, https://example.com is equivalent to https://example.com:443).
Note that Cloud Functions are not restricted by web secure domains. Also, for the convenience of debugging, requests from localhost are always permitted.
Web secure domains setting is meant to prevent attackers from deploying client-side code to abuse the resources of your application. It cannot prevent attackers from forging data since attackers can still access your application by manipulating their host configuration file.
Operation Logs
Dashboard > Settings > Logs displays important operations by the creator and collaborators of the application, like data deletions (including the operator, IP, and time). You can use these logs to audit operations.
Automatic Backup and Restore
The data of applications with Business Plans will be backed up daily and retained for 7 days. You can restore the data on Dashboard > Data Storage > Import/export > Data recovery, where you can refine the scope of restoration to classes or objects specified. This feature is only available to apps with Business Plans.
Notice that:
- You cannot restore data for applications with Developer Plans.
- Files cannot be restored once they are deleted.
- The restoration process will only restore the objects that have been deleted. To restore the objects that have been modified, please make a backup of the existing objects, delete them from the cloud, and then start the restoration process.
- To restore a deleted class, please first create an empty class with the same name and add the corresponding columns to it.
You can also export your application data yourself and make a copy of them to your servers (or upload them to third-party services). This feature is available to all applications.