Cloud Functions and Hooks Guide
This article focuses on a special use case of Cloud Engine that involves Cloud Functions and Hooks. To deploy general-purpose backend applications or learn more about the features provided by Cloud Engine, see Cloud Engine Platform Features.
Cloud Functions lets you run backend code on the cloud in response to various types of events. It is supported by our client-side SDKs and can automatically serialize objects that have the data types provided by our Data Storage service.
The following scenarios can be easily implemented with the help of Cloud Functions and Hooks:
- Manage complex logics in one place without implementing them with different languages for each platform.
- Adjust certain logics of your project on the server side without updating clients.
- Retrieve and update data regardless of the ACL or class permissions.
- Trigger custom logics or perform additional permission checks when objects are created, updated, or deleted, or when users are logged in or verified.
- Run scheduled tasks to fulfill requirements like closing unpaid orders every hour, deleting outdated data every midnight, etc.
You can write Cloud Functions with any of the languages (runtime environments) supported by Cloud Engine, including Node.js, Python, Java, PHP, .NET, and Go. Our dashboard provides an online editor for you to write Cloud Functions in Node.js. If you prefer using another language, please create a project based on our demo project and deploy it to Cloud Engine.
Cloud Functions
Now let’s look at a more complex example. Assuming that we have an app for users to leave their reviews for movies. A Review object would look like this:
{
  "movie": "A Quiet Place",
  "stars": 5,
  "comment": "I almost forgot breathing when watching this movie"
}
Here stars is a number between 1 and 5 that represents the score given by the reviewer. Let’s see how we can define a Cloud Function that helps us calculate the average score of a movie.
Cloud Functions accept requests in the form of JSON objects, which allows us to pass a movie’s name into a function when we invoke the function. Within the Cloud Function, we can use the Data Storage SDK to retrieve all the scores given to a movie. Now we have everything we need to implement our averageStars function:
- Node.js
- Python
- PHP
- Java
- .NET (C#)
- Go
AV.Cloud.define("averageStars", function (request) {
  var query = new AV.Query("Review");
  query.equalTo("movie", request.params.movie);
  return query.find().then(function (results) {
    var sum = 0;
    for (var i = 0; i < results.length; i++) {
      sum += results[i].get("stars");
    }
    return sum / results.length;
  });
});
AV.Cloud.define accepts an optional parameter, options (placed between the function name and the function), which contains the following properties:
fetchUser?: boolean: Whether to automatically fetch the user logged in on the client side. Defaults totrue. When set tofalse,Requestwill not contain thecurrentUserproperty.internal?: boolean: Whether to only allow the function to be invoked within Cloud Engine (withAV.Cloud.runwithout enablingremote) or with theMaster Key(by providinguseMasterKeywhen callingAV.Cloud.run). When set totrue, the function cannot be invoked directly by the client. Defaults tofalse.
For example, if we don’t want to allow clients to invoke the function defined above and we don’t care about the user logged in on the client side, the function above can be rewritten in the following way:
AV.Cloud.define(
  "averageStars",
  { fetchUser: false, internal: true },
  function (request) {
    // Same as above
  }
);
@engine.define
def averageStars(movie, **params):
    reviews = leancloud.Query(Review).equal_to('movie', movie).find()
    result = sum(x.get('stars') for x in reviews)
    return result
The Python function’s name will be used as the default name of the Cloud Function, which you can use to invoke the function with the client SDK. To give the Cloud Function a different name, attach the name after engine.define:
@engine.define('averageStars')
def my_custom_average_start(movie, **params):
    pass
use \LeanCloud\Engine\Cloud;
use \LeanCloud\Query;
use \LeanCloud\CloudException;

Cloud::define("averageStars", function($params, $user) {
    $query = new Query("Review");
    $query->equalTo("movie", $params["movie"]);
    try {
        $reviews = $query->find();
    } catch (CloudException $ex) {
        // Failed to query; output the error to the log
        error_log($ex->getMessage());
        return 0;
    }
    $sum = 0;
    forEach($reviews as $review) {
        $sum += $review->get("stars");
    }
    if (count($reviews) > 0) {
         return $sum / count($reviews);
    } else {
         return 0;
    }
});
@EngineFunction("averageStars")
public static float getAverageStars(@EngineFunctionParam("movie") String movie) throws LCException {
  LCQuery<LCObject> query = new LCQuery("Review");
  query.whereEqualTo("movie", movie);
  List<LCObject> reviews = query.find();
  int sum = 0;
  if (reviews == null && reviews.isEmpty()) {
    return 0;
  }
  for (LCObject review : reviews) {
    sum += review.getInt("star");
  }
  return sum / reviews.size();
}
[LCEngineFunction("averageStars")]
public static float AverageStars([LCEngineFunctionParam("movie")] string movie) {
    if (movie == "A Quiet Place") {
        return 3.8f;
    }
    return 0;
}
type Review struct {
  leancloud.Object
  Movie string `json:"movie"`
  Stars int `json:"stars"`
  Comment string `json:"comment"`
}

leancloud.Engine.Define("averageStars", func(req *leancloud.FunctionRequest) (interface{}, error) {
  reviews := make([]Review, 10) // Reserve some space
  if err := client.Class("Review").NewQuery().EqualTo("movie", req.Params["movie"].(string)).Find(&reviews); err != nil {
    return nil, err
  }

  sum := 0
  for _, v := range reviews {
    sum += v.Stars
  }

  return sum / len(reviews), nil
})
Parameters and Return Values
- Node.js
- Python
- PHP
- Java
- .NET (C#)
- Go
Request will be passed into the Cloud Function as a parameter. It contains the following properties:
params: object: The parameters sent from the client. When the Cloud Function is invoked withrpc, this could be anAV.Object.currentUser?: AV.User: The user logged in on the client (according to theX-LC-Sessionheader sent from the client).sessionToken?: string: ThesessionTokensent from the client (from theX-LC-Sessionheader).meta: object: More information about the client. For now, it only contains aremoteAddressproperty, which contains the IP address of the client.
If the Cloud Function returns a Promise, the resolved value of the Promise will be used as the response. When the Promise gives an error, the error will be used as the response instead. Error objects constructed with AV.Cloud.Error are considered client errors and will not be printed to the standard output. For other errors, call stacks will be printed to the standard output to help you debug your program.
We recommend that you build your program with Promise chains, which makes it easy for you to organize asynchronous tasks and handle errors. Please be sure to chain the Promises and return the chain within the Cloud Function.
Details about the early versions of the Node.js SDK
For Node.js SDK 2.0 and earlier, Cloud Function accepts two parameters: request and response. We will continue supporting this usage until the next major version, though it’s encouraged that you adopt Promise-style Cloud Functions for your project as soon as possible.
The arguments provided when invoking the Cloud Function will be passed directly into the Cloud Function. The parameters of your Cloud Function will mirror those of the Python function defined for it. If you plan to provide different sets of arguments to your Cloud Function for different cases, make sure to update your Python function to treat additional arguments as keyword arguments, or your program may cause Python errors.
@engine.define
def my_cloud_func(foo, bar, baz, **params):
    pass
Besides accessing the arguments passed into the function, your program can obtain additional information about the client by accessing the engine.current object. This object contains the following parameters:
engine.current.user: leancloud.User: The user logged in on the client (according to theX-LC-Sessionheader sent from the client).engine.current.session_token: str: ThesessionTokensent from the client (from theX-LC-Sessionheader).engine.current.meta: dict: More information about the client. For now, it only contains aremote_addressproperty, which contains the IP address of the client.
Each Cloud Function has the following parameters:
$params: array: The arguments sent from the client.$user: User: The user logged in on the client (according to theX-LC-Sessionheader sent from the client).$meta: array: More information about the client. For now, it only contains a$meta['remoteAddress']property, which contains the IP address of the client.
Your program can access the following data from within the Cloud Function:
@EngineFunctionParam: The arguments sent from the client.EngineRequestContext: More information about the client. You can get the sessionToken of the user logged in on the client fromEngineRequestContext.getSessionToken()(according to theX-LC-Sessionheader sent from the client) and the IP address of the client fromEngineRequestContext.getRemoteAddress().
Your program can access the following data from within the Cloud Function:
LCEngineFunctionParam: The arguments sent from the client.LCEngineRequestContext: More information about the client. You can get the sessionToken of the user logged in on the client fromLCEngineRequestContext.SessionToken(according to theX-LC-Sessionheader sent from the client) and the IP address of the client fromLCEngineRequestContext.RemoteAddress.
leancloud.FunctionRequest will be passed into the Cloud Function as an argument. It contains the following properties:
Paramscontains the arguments sent from the client.CurrentUsercontains the user logged in on the client (according to theX-LC-Sessionheader sent from the client). When defining your Cloud Function withDefine, you can provideWithoutFetchUser()as an optional argument to prevent the Cloud Function from obtaining the logged in user form the client.SessionTokencontains thesessionTokensent from the client (from theX-LC-Sessionheader). When defining your Cloud Function withDefine, you can provideWithoutFetchUser()as an optional argument to prevent the Cloud Function from obtaining thesessionTokenfrom the client.Metacontains more information about the client. For now, it only contains aremoteAddressproperty, which contains the IP address of the client.
Invoking Cloud Functions With Client SDKs
You can invoke Cloud Functions with client SDKs:
- .NET
- Java
- Objective-C
- Swift
- Flutter
- JavaScript
- Python
- PHP
- Go
try {
  Dictionary<string, object> response = await LCCloud.Run("averageStars", parameters: new Dictionary<string, object> {
    { "movie", "A Quiet Place" }
  });
  // Handle result
} catch (LCException e) {
  // Handle error
}
// Construct a dictionary containing the arguments to be passed to the server
Map<String, String> dicParameters = new HashMap<String, String>();
dicParameters.put("movie", "A Quiet Place");

// Invoke the Cloud Function named averageStars with arguments
LCCloud.callFunctionInBackground("averageStars", dicParameters).subscribe(new Observer<Object>() {
  @Override
  public void onSubscribe(Disposable disposable) {

  }

  @Override
  public void onNext(Object object) {
    // succeed.
  }

  @Override
  public void onError(Throwable throwable) {
    // failed.
  }

  @Override
  public void onComplete() {

  }
});
Similar to how you use LCQuery, the Java SDK provides a callFunctionWithCacheInBackground method that allows your program to cache the results fetched from the server. You can specify the CachePolicy as well as the maximum age of the cache.
// Construct a dictionary containing the arguments to be passed to the server
NSDictionary *dicParameters = [NSDictionary dictionaryWithObject:@"A Quiet Place"
                                                          forKey:@"movie"];

// Invoke the Cloud Function named averageStars with arguments
[LCCloud callFunctionInBackground:@"averageStars"
                   withParameters:dicParameters
                   block:^(id object, NSError *error) {
                   if(error == nil){
                     // Handle result
                   } else {
                     // Handle error
                   }
}];
LCEngine.run("averageStars", parameters: ["movie": "A Quiet Place"]) { (result) in
    switch result {
    case .success(value: let resultValue):
        print(resultValue)
    case .failure(error: let error):
        print(error)
    }
}
try {
  Map response = await LCCloud.run('averageStars', params: { 'movie': 'A Quiet Place' });
  // Handle result
} on LCException catch (e) {
  // Handle error
}
var paramsJson = {
  movie: "A Quiet Place",
};
AV.Cloud.run("averageStars", paramsJson).then(
  function (data) {
    // Handle result
  },
  function (err) {
    // Handle error
  }
);
from leancloud import cloud

cloud.run('averageStars', movie='A Quiet Place')
use \LeanCloud\Engine\Cloud;
$params = array(
    "movie" => "A Quiet Place"
);
Cloud::run("averageStars", $params);
// ...
averageStars, err := leancloud.Run("averageStars", map[string]string{"movie": "A Quiet Place"})
if err != nil {
  panic(err)
}
// ...
When running a Cloud Function, the arguments and responses will be treated as JSON objects. To pass LCObjects through requests and responses, you can invoke the Cloud Function with RPC, which makes the SDK serialize and deserialize LCObjects. This allows your program within the Cloud Function and on the client side to have access to the LCObjects directly:
- .NET
- Java
- Objective-C
- Swift
- Flutter
- JavaScript
- Python
- PHP
- Go
try {
  LCObject response = await LCCloud.RPC("averageStars", parameters: new Dictionary<string, object> {
    { "movie", "A Quiet Place" }
  });
  // Handle result
} catch (LCException e) {
  // Handle error
}
// Construct arguments
Map<String, Object> dicParameters = new HashMap<>();
dicParameters.put("movie", "A Quiet Place");

LCCloud.<LCObject>callRPCInBackground("averageStars", dicParameters).subscribe(new Observer<LCObject>() {
  @Override
  public void onSubscribe(Disposable disposable) {

  }

  @Override
  public void onNext(LCObject avObject) {
    // succeed.
  }

  @Override
  public void onError(Throwable throwable) {
    // failed
  }

  @Override
  public void onComplete() {

  }
});
Similar to how you use LCQuery, the Java SDK provides a callRPCWithCacheInBackground method that allows your program to cache the results fetched from the server. You can specify the CachePolicy as well as the maximum age of the cache.
NSDictionary *dicParameters = [NSDictionary dictionaryWithObject:@"A Quiet Place"
                                                          forKey:@"movie"];

[LCCloud rpcFunctionInBackground:@"averageStars"
                  withParameters:parameters
                  block:^(id object, NSError *error) {
                  if(error == nil){
                    // Handle result
                  }
                  else {
                    // Handle error
                  }
}];
LCEngine.call("averageStars", parameters: ["movie": "A Quiet Place"]) { (result) in
    switch result {
    case .success(object: let object):
        if let object = object {
            print(object)
        }
    case .failure(error: let error):
        print(error)
    }
}
try {
  LCObject response = await LCCloud.rpc('averageStars', params: { 'movie': 'A Quiet Place' });
  // Handle result
} on LCException catch (e) {
  // Handle error
}
var paramsJson = {
  movie: "A Quiet Place",
};

AV.Cloud.rpc("averageStars", paramsJson).then(
  function (object) {
    // Handle result
  },
  function (error) {
    // Handle error
  }
);
from leancloud import cloud

cloud.rpc('averageStars', movie='A Quiet Place')
// Not supported yet
// ...
averageStars := 0
if err := leancloud.RPC("averageStars", Review{Movie: "A Quiet Place"}, &averageStars); err != nil {
  panic(err)
}
// ..
When using RPC, the SDK will process the objects in the following forms that exist in the requests and responses:
- Single LCObject
- A HashMap containing LCObjects
- An array containing LCObjects
Everything else in the requests and responses will remain in their original forms.
Invoking Other Cloud Functions Within a Cloud Function
- Node.js
- Python
- PHP
- Java
- .NET (C#)
- Go
When invoking a Cloud Function under the Node.js runtime environment, a local invocation will be triggered by default, which means that the invocation won’t make an HTTP request like what the client SDK would do.
AV.Cloud.run("averageStars", {
  movie: "A Quiet Place",
}).then(
  function (data) {
    // Succeeded; data is the response
  },
  function (error) {
    // Handle error
  }
);
To force the invocation to make an HTTP request, provide the remote: true option. This is useful when you run the Node.js SDK in a different group or outside Cloud Engine:
AV.Cloud.run("averageStars", { movie: "A Quiet Place" }, { remote: true }).then(
  function (data) {
    // Succeeded
  },
  function (error) {
    // Handle error
  }
);
Here remote constitutes a part of the options object, which is an optional parameter of AV.Cloud.run. options contains the following parameters:
remote?: boolean: Theremoteoption used in the example above. Defaults tofalse.user?: AV.User: The user used to invoke the Cloud Function. Often used whenremoteisfalse.sessionToken?: string: ThesessionTokenused to invoke the Cloud Function. Often used whenremoteistrue.req?: http.ClientRequest | express.Request: Used to provide properties likeremoteAddressfor the Cloud Function being invoked.
When invoking a Cloud Function under the Python runtime environment, a remote invocation will be triggered by default. The code below will make an HTTP request to invoke a Cloud Function on Cloud Engine.
from leancloud import cloud

cloud.run('averageStars', movie='A Quiet Place')
To invoke a local Cloud Function (i.e., a Cloud Function that exists in the current process) or to save an HTTP request when invoking a Cloud Function from within Cloud Engine, use leancloud.cloud.run.local instead of leanengine.cloud.run. This will let your program invoke the Cloud Function in the current process without making an HTTP request.
When you invoke a Cloud Function from Cloud Engine, a local invocation will be made instead of a remote invocation that relies on an HTTP request.
try {
    $result = Cloud::run("averageStars", array("movie" => "A Quiet Place"));
} catch (\Exception $ex) {
    // Cloud Function error
}
To make an invocation using an HTTP request, use the runRemote method:
try {
    $token = User::getCurrentSessionToken(); // Invoke the Cloud Function with a specific `sessionToken`; optional
    $result = Cloud::runRemote("averageStars", array("movie" => "A Quiet Place"), $token);
} catch (\Exception $ex) {
    // Cloud Function error
}
Local invocations of Cloud Functions are not supported by the Java SDK. To reuse the same set of code, we recommend that you put them into basic Java functions and invoke them from different Cloud Functions.
Local invocations of Cloud Functions are not supported by the .NET SDK. To reuse the same set of code, we recommend that you put them into basic functions and invoke them from different Cloud Functions.
To trigger a local invocation, use Engine.Run:
averageStars, err := leancloud.Engine.Run("averageStars", Review{Movie: "A Quiet Place"})
if err != nil {
  panic(err)
}
To make an invocation using an HTTP request, use Client.Run.
Run has the following optional parameters:
WithSessionToken(token)can be used to provide asessionTokenfor the current invocationWithUser(user)can be used to provide a user for the current invocation
Error Codes for Cloud Functions
You can define custom error codes according to HTTP status codes.
- Node.js
- Python
- PHP
- Java
- .NET (C#)
- Go
AV.Cloud.define("customErrorCode", function (request) {
  throw new AV.Cloud.Error("Custom error message.", { code: 123 });
});
from leancloud import LeanEngineError

@engine.define
def custom_error_code(**params):
    raise LeanEngineError(123, 'Custom error message.')
Cloud::define("customErrorCode", function($params, $user) {
    throw new FunctionError("Custom error message.", 123);
});
@EngineFunction()
public static void customErrorCode() throws Exception {
  throw new LCException(123, "Custom error message.");
}
[LCEngineFunction("throwLCException")]
public static void ThrowLCException() {
    throw new LCException(123, "Custom error message.");
}
leancloud.Engine.Define("customErrorCode", func(req *leancloud.FunctionRequest) (interface{}, error) {
  return nil, leancloud.CloudError{123, "Custom error message."}
})
The response gotten by the client would look like { "code": 123, "error": "Custom error message." }.
Timeouts for Cloud Functions
The default timeout for invoking a Cloud Function is 15 seconds. If the timeout is exceeded, the client will get a response with the HTTP status code 503 and the body being The request timed out on the server.
Keep in mind that even though the client has already gotten a response, the Cloud Function might still be running, although its response will not be received by the client anymore (the error message Can't set headers after they are sent will be printed to the log).
In certain cases, the client will receive the 524 or 141 error instead of the 503 error.
Avoiding Timeouts
To prevent Cloud Functions and scheduled tasks from causing timeouts, we recommend that you convert time-consuming tasks in your code to queued tasks that can be executed asynchronously.
For example, you can:
- Create a table in the Data Storage service with a column named
status; - When a task is received, create an object in the table with
statusbeingPROCESSING, then respond to the client with the object’sid. - When a task is completed, update the
statusof the corresponding object toCOMPLETEDorFAILED; - You can look up the status of a task with its
idon the dashboard at any time.
The method introduced above might not apply to before hooks.
Although you can ensure a before hook to complete within the timeout using the method above,
its ability to abort an action when an error occurs will not work anymore.
If you have a before hook that keeps exceeding the timeout, consider changing it to an after hook.
For example, if a beforeSave hook needs to invoke a time-consuming API to tell if a user’s comment is spam,
you can change it to an afterSave hook that invokes the API after the comment has been saved and deletes the comment if it is spam.
Hooks for Data Storage
Hooks are a special type of Cloud Functions that get triggered automatically by the system when certain events take place. Keep in mind that:
- Importing data on the dashboard will not trigger any hooks.
- Be careful not to form infinite loops with your hooks.
- Hooks don’t work with the
_Installationtable. - Hooks only work with the classes that belong to the current application, which don’t include those bound to the current application.
For before hooks, if an error is returned by the function, the original operation will be aborted. This means that you can reject an operation by having the function throw an error. This does not apply to after hooks since the operation would’ve been completed when the function starts running.
Our SDK will run authentication to ensure that the hook requests received by it are the legitimate ones sent from the Data Storage service. If the authentication fails, you may see a message saying Hook key check failed. If you see this message when debugging your project locally, please ensure that you have started your project with the CLI.
BeforeSave
This hook can be used to perform operations like cleanups and verifications before a new object gets created. For example, if we need to truncate each comment to 140 characters:
- Node.js
- Python
- PHP
- Java
- .NET (C#)
- Go
AV.Cloud.beforeSave("Review", function (request) {
  var comment = request.object.get("comment");
  if (comment) {
    if (comment.length > 140) {
      // Truncate the comment and add '…'
      request.object.set("comment", comment.substring(0, 140) + "…");
    }
  } else {
    // Don’t save the object and return an error
    throw new AV.Cloud.Error("No comment provided!");
  }
});
In the example above, request.object is the AV.Object we are performing our operation on. request has another property besides object:
currentUser?: AV.User: The user who triggered the operation.
The request parameter (and its properties) are available in other hooks as well.
@engine.before_save('Review') # `Review` is the name of the class that the hook will be applied to
def before_review_save(review):
    comment = review.get('comment')
    if not comment:
        raise leancloud.LeanEngineError(message='No comment provided!')
    if len(comment) > 140:
        review.comment.set('comment', comment[:140] + '…')
Cloud::beforeSave("Review", function($review, $user) {
    $comment = $review->get("comment");
    if ($comment) {
        if (strlen($comment) > 140) {
            // Truncate the comment and add '…'
            $review->set("comment", substr($comment, 0, 140) . "…");
        }
    } else {
        // Don’t save the object and return an error
        throw new FunctionError("No comment provided!", 101);
    }
});
@EngineHook(className = "Review", type = EngineHookType.beforeSave)
public static LCObject reviewBeforeSaveHook(LCObject review) throws Exception {
  if (StringUtil.isEmpty(review.getString("comment"))) {
    throw new Exception("No comment provided!");
  } else if (review.getString("comment").length() > 140) {
    review.put("comment", review.getString("comment").substring(0, 140) + "…");
  }
  return review;
}
[LCEngineClassHook("Review", LCEngineObjectHookType.BeforeSave)]
public static LCObject ReviewBeforeSave(LCObject review) {
    if (string.IsNullOrEmpty(review["comment"])) {
        throw new Exception("No comment provided!");
    }
    string comment = review["comment"] as string;
    if (comment.Length > 140) {
        review["comment"] = string.Format($"{comment.Substring(0, 140)}...");
    }
    return review;
}
leancloud.Engine.BeforeSave("Review", func(req *ClassHookRequest) (interface{}, error) {
  review := new(Review)
  if err := req.Object.Clone(review); err != nil {
    return nil, err
  }

  if len(review.Comment) > 140 {
    review.Comment = review.Comment[:140]
  }

  return review, nil
})
AfterSave
This hook can be used to perform operations after a new object has been created. For example, if we need to update the total number of comments after a comment has been created:
- Node.js
- Python
- PHP
- Java
- .NET (C#)
- Go
AV.Cloud.afterSave("Comment", function (request) {
  var query = new AV.Query("Post");
  return query.get(request.object.get("post").id).then(function (post) {
    post.increment("comments");
    return post.save();
  });
});
import leancloud

@engine.after_save('Comment') # `Comment` is the name of the class that the hook will be applied to
def after_comment_save(comment):
    post = leancloud.Query('Post').get(comment.id)
    post.increment('commentCount')
    try:
        post.save()
    except leancloud.LeanCloudError:
        raise leancloud.LeanEngineError(message='An error occurred while trying to save the post.')
Cloud::afterSave("Comment", function($comment, $user) {
    $query = new Query("Post");
    $post = $query->get($comment->get("post")->getObjectId());
    $post->increment("commentCount");
    try {
        $post->save();
    } catch (CloudException $ex) {
        throw new FunctionError("An error occurred while trying to save the post: " . $ex->getMessage());
    }
});
@EngineHook(className = "Review", type = EngineHookType.afterSave)
public static void reviewAfterSaveHook(LCObject review) throws Exception {
  LCObject post = review.getLCObject("post");
  post.fetch();
  post.increment("comments");
  post.save();
}
[LCEngineClassHook("Review", LCEngineObjectHookType.AfterSave)]
public static async Task ReviewAfterSave(LCObject review) {
    LCObject post = review["post"] as LCObject;
    await post.Fetch();
    post.Increment("comments", 1);
    await post.Save();
}
leancloud.Engine.AfterSave("Review", func(req *ClassHookRequest) error {
  review := new(Review)
  if err := req.Object.Clone(review); err != nil {
    return err
  }

  if err := client.Object(review.Post).Update(map[string]interface{}{
    "comment": leancloud.OpIncrement(1),
  }); err != nil {
    return leancloud.CloudError{Code: 500, Message: err.Error()}
  }

  return nil
})
In the following example, we are adding a from property to each new user:
- Node.js
- Python
- PHP
- Java
- .NET (C#)
- Go
AV.Cloud.afterSave("_User", function (request) {
  console.log(request.object);
  request.object.set("from", "LeanCloud");
  return request.object.save().then(function (user) {
    console.log("Success!");
  });
});
Although we don’t care about the return value of an after hook, we still recommend that you have your function return a Promise. This ensures that you can see error messages and call stacks in the standard output when unexpected errors occur.
@engine.after_save('_User')
def after_user_save(user):
    print(user)
    user.set('from', 'LeanCloud')
    try:
        user.save()
    except LeanCloudError, e:
        print('Error: ', e)
Cloud::afterSave("_User", function($userObj, $currentUser) {
    $userObj->set("from", "LeanCloud");
    try {
        $userObj->save();
    } catch (CloudException $ex) {
        throw new FunctionError("An error occurred while trying to save the user: " . $ex->getMessage());
    }
});
@EngineHook(className = "_User", type = EngineHookType.afterSave)
public static void userAfterSaveHook(LCUser user) throws Exception {
  user.put("from", "LeanCloud");
  user.save();
}
[LCEngineClassHook("_User", LCEngineObjectHookType.AfterSave)]
public static async Task UserAfterSave(LCObject user) {
    user["from"] = "LeanCloud";
    await user.Save();
}
leancloud.Engine.AfterSave("_User", func(req *ClassHookRequest) error{
  if req.User != nil {
    if err := client.User(req.User).Set("from", "LeanCloud"); err != nil {
      return err
    }
  }
  return nil
})
BeforeUpdate
This hook can be used to perform operations before an existing object gets updated. You will be able to know which fields have been updated and reject the operation if necessary:
- Node.js
- Python
- PHP
- Java
- .NET (C#)
- Go
AV.Cloud.beforeUpdate("Review", function (request) {
  // If `comment` has been updated, check its length
  if (request.object.updatedKeys.indexOf("comment") != -1) {
    if (request.object.get("comment").length > 140) {
      // Reject the update if the comment is too long
      throw new AV.Cloud.Error(
        "The comment should be no longer than 140 characters."
      );
    }
  }
});
@engine.before_update('Review')
def before_hook_object_update(obj):
    # If `comment` has been updated, check its length
    if 'comment' in obj.updated_keys and len(obj.get('comment')) > 140:
        # Reject the update if the comment is too long
        raise leancloud.LeanEngineError(message='The comment should be no longer than 140 characters.')
Cloud::beforeUpdate("Review", function($review, $user) {
    // If `comment` has been updated, check its length
    if (in_array("comment", $review->updatedKeys) &&
        strlen($review->get("comment")) > 140) {
        throw new FunctionError("The comment should be no longer than 140 characters.");
    }
});
@EngineHook(className = "Review", type = EngineHookType.beforeUpdate)
public static LCObject reviewBeforeUpdateHook(LCObject review) throws Exception {
  List<String> updateKeys = EngineRequestContext.getUpdateKeys();
  for (String key : updateKeys) {
    // If `comment` has been updated, check its length
    if ("comment".equals(key) && review.getString("comment").length()>140) {
      throw new Exception("The comment should be no longer than 140 characters.");
    }
  }
  return review;
}
[LCEngineClassHook("Review", LCEngineObjectHookType.BeforeUpdate)]
public static LCObject ReviewBeforeUpdate(LCObject review) {
    ReadOnlyCollection<string> updatedKeys = review.GetUpdatedKeys();
    if (updatedKeys.Contains("comment")) {
        string comment = review["comment"] as string;
        if (comment.Length > 140) {
            throw new Exception("The comment should be no longer than 140 characters.");
        }
    }
    return review;
}
leancloud.Engine.BeforeUpdate("Review", func(req *ClassHookRequest) (interface{}, error) {
  updatedKeys = req.UpdatedKeys()
  for _, v := range updatedKeys {
    if v == "comment" {
      comment, ok := req.Object.Raw()["comment"].(string)
      if !ok {
        return nil, leancloud.CloudError{Code: 400, Message: "Bad Request"}
      }

      if len(comment) > 140 {
        return nil, leancloud.CloudError{Code: 400, Message: "Bad Request"}
      }
    }
  }

  return nil, nil
})
Modifications done directly to the object passed in will not be saved. To reject the update, you can have the function return an error.
The object passed in is a temporary object not saved to the database yet. The object might not be the same as the one saved to the database in the end because there might be atomic operations like self-increments, array operations, and adding or updating relations that will happen later.
AfterUpdate
This hook might lead to infinite loops if you use it improperly, causing additional API calls and even extra charges. Please make sure to read Avoiding Infinite Loops carefully.
This hook can be used to perform operations after an existing object has been updated. Similar to BeforeUpdate, you will be able to know which fields have been updated.
- Node.js
- Python
- PHP
- Java
- .NET (C#)
- Go
AV.Cloud.afterUpdate("Review", function (request) {
  if (request.object.updatedKeys.indexOf("comment") != -1) {
    if (request.object.get("comment").length < 5) {
      console.log(review.ObjectId + " looks like spam: " + comment);
    }
  }
});
@engine.after_update('Review')
def after_review_update(article):
    if 'comment' in obj.updated_keys and len(obj.get('comment')) < 5:
        print(review.ObjectId + " looks like spam: " + comment)
Cloud::afterUpdate("Review", function($review, $user) {
    if (in_array("comment", $review->updatedKeys) &&
        strlen($review->get("comment")) < 5) {
        error_log(review.ObjectId . " looks like spam: " . comment);
    }
});
@EngineHook(className = "Review", type = EngineHookType.afterUpdate)
public static void reviewAfterUpdateHook(LCObject review) throws Exception {
  List<String> updateKeys = EngineRequestContext.getUpdateKeys();
  for (String key : updateKeys) {
    if ("comment".equals(key) && review.getString("comment").length()<5) {
      LOGGER.d(review.ObjectId + " looks like spam: " + comment);
    }
  }
}
[LCEngineClassHook("Review", LCEngineObjectHookType.AfterUpdate)]
public static void ReviewAfterUpdate(LCObject review) {
    ReadOnlyCollection<string> updatedKeys = review.GetUpdatedKeys();
    if (updatedKeys.Contains("comment")) {
        string comment = review["comment"] as string;
        if (comment.Length < 5) {
            Console.WriteLine($"{review.ObjectId} looks like spam: {comment}");
        }
    }
}
leancloud.Engine.AfterUpdate("Review", func(req *ClassHookRequest) error {
  updatedKeys := req.UpdatedKeys()
  for _, v := range updatedKeys {
    if v == "comment" {
      comment, ok := req.Object.Raw()["comment"].(string)
      if !ok {
        return nil, leancloud.CloudError{Code: 400, Message: "Bad Request"}
      }

      if len(comment) < 5 {
        fmt.Println(req.Object.ID, " looks like spam: ", comment))
      }
    }
  }

  return nil
})
BeforeDelete
This hook can be used to perform operations before an object gets deleted. For example, to check if an Album contains any Photos before it gets deleted:
- Node.js
- Python
- PHP
- Java
- .NET (C#)
- Go
AV.Cloud.beforeDelete("Album", function (request) {
  // See if any `Photo` belongs to this album
  var query = new AV.Query("Photo");
  var album = AV.Object.createWithoutData("Album", request.object.id);
  query.equalTo("album", album);
  return query.count().then(
    function (count) {
      if (count > 0) {
        // The `delete` operation will be aborted
        throw new AV.Cloud.Error(
          "Cannot delete an album if it still has photos in it."
        );
      }
    },
    function (error) {
      throw new AV.Cloud.Error(
        "Error " +
          error.code +
          " occurred when finding photos: " +
          error.message
      );
    }
  );
});
import leancloud

@engine.before_delete('Album') # `Album` is the name of the class that the hook will be applied to
def before_album_delete(album):
    query = leancloud.Query('Photo')
    query.equal_to('album', album)
    try:
        matched_count = query.count()
    except leancloud.LeanCloudError:
        raise engine.LeanEngineError(message='An error occurred with LeanEngine.')
    if count > 0:
        # The `delete` operation will be aborted
        raise engine.LeanEngineError(message='Cannot delete an album if it still has photos in it.')
Cloud::beforeDelete("Album", function($album, $user) {
    $query = new Query("Photo");
    $query->equalTo("album", $album);
    try {
        $count = $query->count();
    } catch (CloudException $ex) {
        throw new FunctionError("An error occurred when getting photo count: {$ex->getMessage()}");
    }
    if ($count > 0) {
        // The `delete` operation will be aborted
        throw new FunctionError("Cannot delete an album if it still has photos in it.");
    }
});
@EngineHook(className = "Album", type = EngineHookType.beforeDelete)
public static LCObject albumBeforeDeleteHook(LCObject album) throws Exception {
  LCQuery query = new LCQuery("Photo");
  query.whereEqualTo("album", album);
  int count = query.count();
  if (count > 0) {
    // The `delete` operation will be aborted
    throw new Exception("Cannot delete an album if it still has photos in it.");
  } else {
    return album;
  }
}
[LCEngineClassHook("Album", LCEngineObjectHookType.BeforeDelete)]
public static async Task<LCObject> AlbumBeforeDelete(LCObject album) {
    LCQuery<LCObject> query = new LCQuery<LCObject>("Photo");
    query.WhereEqualTo("album", album);
    int count = await query.Count();
    if (count > 0) {
        throw new Exception("Cannot delete an album if it still has photos in it.");
    }
    return album;
}
leancloud.Engine.BeforeDelete("Album", func(req *ClassHookRequest) (interface{}, error) {
  photo := new(Photo)
  if err := req.Object.Clone(photo); err != nil {
    return nil, err
  }

  count, err := client.Class("Photo").NewQuery().EqualTo("album", photo.Album).Count()
  if err != nil {
    return nil, err
  }

  if count > 0 {
    return nil, leancloud.CloudError{Code: 500, Message: "Cannot delete an album if it still has photos in it."}
  }

  fmt.Println("Deleted.")

  return nil, nil
})
AfterDelete
This hook can be used to perform operations like decrementing counters and removing associated objects after an object has been deleted. For example, to delete the photos in an album after the album has been deleted:
- Node.js
- Python
- PHP
- Java
- .NET (C#)
- Go
AV.Cloud.afterDelete("Album", function (request) {
  var query = new AV.Query("Photo");
  var album = AV.Object.createWithoutData("Album", request.object.id);
  query.equalTo("album", album);
  return query
    .find()
    .then(function (posts) {
      return AV.Object.destroyAll(posts);
    })
    .catch(function (error) {
      console.error(
        "Error " +
          error.code +
          " occurred when finding photos: " +
          error.message
      );
    });
});
import leancloud

@engine.after_delete('Album') # `Album` is the name of the class that the hook will be applied to
def after_album_delete(album):
    query = leancloud.Query('Photo')
    query.equal_to('album', album)
    try:
        query.destroy_all()
    except leancloud.LeanCloudError:
        raise leancloud.LeanEngineError(message='An error occurred with LeanEngine.')
Cloud::afterDelete("Album", function($album, $user) {
    $query = new Query("Photo");
    $query->equalTo("album", $album);
    try {
        $photos = $query->find();
        LeanObject::destroyAll($photos);
    } catch (CloudException $ex) {
        throw new FunctionError("An error occurred when getting photo count: {$ex->getMessage()}");
    }
});
@EngineHook(className = "Album", type = EngineHookType.afterDelete)
public static void albumAfterDeleteHook(LCObject album) throws Exception {
  LCQuery query = new LCQuery("Photo");
  query.whereEqualTo("album", album);
  List<LCObject> result = query.find();
  if (result != null && !result.isEmpty()) {
    LCObject.deleteAll(result);
  }
}
[LCEngineClassHook("Album", LCEngineObjectHookType.AfterDelete)]
public static async Task AlbumAfterDelete(LCObject album) {
    LCQuery<LCObject> query = new LCQuery<LCObject>("Photo");
    query.WhereEqualTo("album", album);
    ReadOnlyCollection<LCObject> result = await query.Find();
    if (result != null && result.Count > 0) {
        await LCObject.DeleteAll(result);
    }
}
leancloud.Engine.AfterDelete("Album", func(req *ClassHookRequest) error {
  photo := new(Photo)
  if err := req.Object.Clone(photo); err != nil {
    return nil, err
  }

  count, err := client.Class("Photo").NewQuery().EqualTo("album", photo.Album).Count()
  if err != nil {
    return nil, err
  }

  if count > 0 {
    return nil, leancloud.CloudError{Code: 500, Message: "An error occurred with LeanEngine."}
  }

  fmt.Println("Deleted.")

  return nil, nil
})
OnVerified
This hook can be used to perform operations after a user has verified their email or phone number. For example:
- Node.js
- Python
- PHP
- Java
- .NET (C#)
- Go
AV.Cloud.onVerified("sms", function (request) {
  console.log("User " + request.object + " is verified by SMS.");
});
The object in the example above can be replaced by currentUser since the user who triggered the operation is also the one that we want to perform operations on.
This also applies to the onLogin hook, which we’ll introduce later.
@engine.on_verified('sms')
def on_sms_verified(user):
    print(user)
Cloud::onVerifed("sms", function($user, $meta) {
    error_log("User {$user->getUsername()} is verified by SMS.");
});
@EngineHook(className = "_User", type = EngineHookType.onVerifiedSMS)
public static void userOnVerifiedHook(LCUser user) throws Exception {
  LOGGER.d("User " + user.getObjectId() + " has verified their phone number.");
}

@EngineHook(className = "_User", type = EngineHookType.onVerifiedEmail)
public static void userOnVerifiedHook(LCUser user) throws Exception {
  LOGGER.d("User " + user.getObjectId() + " has verified their email.");
}
[LCEngineUserHook(LCEngineUserHookType.OnSMSVerified)]
public static void OnVerifiedSMS(LCUser user) {
    Console.WriteLine($"User {user.ObjectId} has verified their phone number.");
}

[LCEngineUserHook(LCEngineUserHookType.OnEmailVerified)]
public static void OnVerifiedEmail(LCUser user) {
    Console.WriteLine($"User {user.ObjectId} has verified their email.");
}
leancloud.Engine.OnVerified("sms", func(req *ClassHookRequest) error {
  fmt.Println("User ", req.User.ID, " has verified their phone number.")
})

leancloud.Engine.OnVerified("email", func(req *ClassHookRequest) error {
  fmt.Println("User ", req.User.ID, " has verified their email.")
})
Fields like emailVerified should not be updated here since the system will update them automatically.
This hook is an after hook.
OnLogin
This hook can be used to perform operations before a user gets logged in. For example, to prevent users on the blocklist from logging in:
- Node.js
- Python
- PHP
- Java
- .NET (C#)
- Go
AV.Cloud.onLogin(function (request) {
  // The user has not logged in yet, so the user data is in `request.object`
  console.log("User " + request.object + " is trying to log in.");
  if (request.object.get("username") === "noLogin") {
    // If the program throws an error, the user won’t be able to log in (the client will receive a 401 error)
    throw new AV.Cloud.Error("Forbidden");
  }
});
@engine.on_login
def on_login(user):
    print(user)
    if user.get('username') == 'noLogin':
      # If the program throws a `LeanEngineError`, the user won’t be able to log in (the client will receive a 401 error)
      raise LeanEngineError('Forbidden')
    # If the program doesn’t throw an error, the user will be able to log in
Cloud::onLogin(function($user) {
    error_log("User {$user->getUsername()} is trying to log in.");
    if ($user->get("blocked")) {
        // If the program throws an error, the user won’t be able to log in (the client will receive a 401 error)
        throw new FunctionError("Forbidden");
    }
    // If the program doesn’t throw an error, the user will be able to log in
});
@EngineHook(className = "_User", type = EngineHookType.onLogin)
public static LCUser userOnLoginHook(LCUser user) throws Exception {
  if ("noLogin".equals(user.getUsername())) {
    throw new Exception("Forbidden");
  } else {
    return user;
  }
}
[LCEngineUserHook(LCEngineUserHookType.OnLogin)]
public static LCUser OnLogin(LCUser user) {
    if (user.Username == "noLogin") {
        throw new Exception("Forbidden");
    }
    return user;
}
leancloud.Engine.OnLogin(func(req *ClassHookRequest) error {
  fmt.Println("User ", req.User.ID, " has logged in.")
})
This hook is a before hook.
OnAuthData
This hook gets triggered when a user’s authData gets updated. You can perform verifications and modifications to users’ authData with this hook. For example:
- Node.js
- Python
- .NET (C#)
AV.Cloud.onAuthData(function (request) {
  let authData = request.authData;
  console.log(authData);

  if (authData.weixin.code === "12345") {
    authData.weixin.accessToken = "45678";
  } else {
    // Verification failed; an error will be thrown and the user won’t be able to log in
    throw new AV.Cloud.Error("invalid code");
  }
  // Verification succeeded; the verified or modified `authData` will be returned and the user will be able to log in
  return authData;
});
@engine.on_auth_data
def on_auth_data(auth_data):
    if auth_data['weixin']['code'] == '12345':
        # Verification succeeded; the verified or modified `auth_data` will be returned and the user will be able to log in
        auth_data['weixin']['code'] = '45678'
        return auth_data
    else:
        # Verification failed; an error will be thrown and the user won’t be able to log in
        raise LeanEngineError('invalid code')
[LCEngineUserHook(LCEngineUserHookType.OnAuthData)]
public static Dictionary<string, object> OnAuthData(Dictionary<string, object> authData) {
  if (authData.TryGetValue("fake_platform", out object tokenObj)) {
    if (tokenObj is Dictionary<string, object> token) {
      // Emulating the verification process
      if (token["openid"] as string == "123" && token["access_token"] as string == "haha") {
        LCLogger.Debug("Auth data Verified OK.");
      } else {
        throw new Exception("Invalid auth data.");
      }
    } else {
      throw new Exception("Invalid auth data");
    }
  }
  return authData;
This hook is a before hook.
Avoiding Infinite Loops
You might be curious about why saving post in AfterUpdate won’t trigger the same hook again.
This is because Cloud Engine has processed the object being passed in to prevent infinite loops.
However, this mechanism won’t work when one of the following situations happens:
- Calling
fetchon the object being passed in. - Reconstructing the object being passed in.
In these cases, you might want to call the method for disabling hooks yourself:
- Node.js
- Python
- PHP
- Java
- .NET (C#)
// Directly editing and saving an object won’t trigger the `afterUpdate` hook
request.object.set("foo", "bar");
request.object.save().then(function (obj) {
  // Your code
});

// If `fetch` has been called on the object, call `disableAfterHook` on the new object to prevent the object from triggering the hook
request.object
  .fetch()
  .then(function (obj) {
    obj.disableAfterHook();
    obj.set("foo", "bar");
    return obj.save();
  })
  .then(function (obj) {
    // Your code
  });

// If the object has been reconstructed, call `disableAfterHook` on the new object to prevent the object from triggering the hook
var obj = AV.Object.createWithoutData("Post", request.object.id);
obj.disableAfterHook();
obj.set("foo", "bar");
obj.save().then(function (obj) {
  // Your code
});
@engine.after_update('Post')
def after_post_update(post):
    # Directly editing and saving an object won’t trigger the `after_update` hook
    post.set('foo', 'bar')
    post.save()

    # If `fetch` has been called on the object, call `disable_after_hook` on the new object to prevent the object from triggering the hook
request.object
    post.fetch()
    post.disable_after_hook()
    post.set('foo', 'bar')

    # If the object has been reconstructed, call `disable_after_hook` on the new object to prevent the object from triggering the hook
    post = leancloud.Object.extend('Post').create_without_data(post.id)
    post.disable_after_hook()
    post.save()
Cloud::afterUpdate("Post", function($post, $user) {
    // Directly editing and saving an object won’t trigger the `afterUpdate` hook
    $post->set('foo', 'bar');
    $post->save();

    // If `fetch` has been called on the object, call `disableAfterHook` on the new object to prevent the object from triggering the hook
    $post->fetch();
    $post->disableAfterHook();
    $post->set('foo', 'bar');
    $post->save();

    // If the object has been reconstructed, call `disableAfterHook` on the new object to prevent the object from triggering the hook
    $post = LeanObject::create("Post", $post->getObjectId());
    $post->disableAfterHook();
    $post->save();
});
@EngineHook(className="Post", type = EngineHookType.afterUpdate)
public static void afterUpdatePost(LCObject post) throws LCException {
  // Directly editing and saving an object won’t trigger the `afterUpdate` hook
  post.put("foo", "bar");
  post.save();

  // If `fetch` has been called on the object, call `disableAfterHook` on the new object to prevent the object from triggering the hook
  post.fetch();
  post.disableAfterHook();
  post.put("foo", "bar");

  // If the object has been reconstructed, call `disableAfterHook` on the new object to prevent the object from triggering the hook
  post = LCObject.createWithoutData("Post", post.getObjectId());
  post.disableAfterHook();
  post.save();
}
// Directly editing and saving an object won’t trigger the `afterUpdate` hook
post["foo"] = "bar";
await post.Save();

// If `fetch` has been called on the object, call `DisableAfterHook` on the new object to prevent the object from triggering the hook
await post.Fetch();
post.DisableAfterHook();
post["foo"] = "bar";

// If the object has been reconstructed, call `DisableAfterHook` on the new object to prevent the object from triggering the hook
post = LCObject.CreateWithoutData("Post", post.ObjectId);
post.DisableAfterHook();
await post.Save();
Error Codes for Hooks
Use the following way to define error codes for hooks like BeforeSave:
- Node.js
- Python
- PHP
- Java
- .NET (C#)
- Go
AV.Cloud.beforeSave("Review", function (request) {
  // Convert the object to a string with JSON.stringify()
  throw new AV.Cloud.Error(
    JSON.stringify({
      code: 123,
      message: "An error occurred.",
    })
  );
});
@engine.before_save('Review') # `Review` is the name of the class that the hook will be applied to
def before_review_save(review):
    comment = review.get('comment')
    if not comment:
      raise leancloud.LeanEngineError(
        code=123,
        message='An error occurred.'
      )
Cloud::beforeSave("Review", function($review, $user) {
   $comment = $review->get("comment");
   if (!$comment) {
       throw new FunctionError(json_encode(array(
           "code" => 123,
           "message" => "An error occurred.",
       )));
   }
});
@EngineHook(className = "Review", type = EngineHookType.beforeSave)
public static LCObject reviewBeforeSaveHook(LCObject review) throws Exception {
  throw new LCException(123, "An error occurred.");
}
[LCEngineClassHook("Review", LCEngineObjectHookType.BeforeDelete)]
public static void ReviewBeforeDelete(LCObject review) {
    throw new LCException(123, "An error occurred.");
}
leancloud.Engine.BeforeSave("Review", func(req *ClassHookRequest) (interface{}, error) {
  return nil, leancloud.CloudError{Code: 123, Message: "An error occurred."}
})
The response gotten by the client would look like Cloud Code validation failed. Error detail: { "code": 123, "message": "An error occurred." }. The client can then slice the string to get the error message.
Timeouts for Hooks
The timeout for before hooks is 10 seconds while that for other hooks is 3 seconds. If a hook is triggered by another Cloud Function (like when a BeforeSave or AfterSave hook gets triggered when a new object gets created), its timeout will be cut down to the remaining timeout of the triggering Cloud Function.
For example, if a BeforeSave hook is triggered by a Cloud Function that has already been executed for 13 seconds, the hook will only have 2 seconds left. See Timeouts for Cloud Functions for more information.
Hooks for Instant Messaging
See Hooks and System Conversations for more information.
Writing Cloud Functions Online
You can write Cloud Functions online using the dashboard instead of creating and deploying a project. Keep in mind that:
- Deploying the Cloud Functions you write online will override the project deployed with Git or the CLI.
- You can only write Cloud Functions and hooks online. You can’t upload static web pages or write dynamic routes with the web interface.
- You can only use the JavaScript SDK together with some built-in Node.js modules (listed in the table below). You can’t import other modules as dependencies.
Path
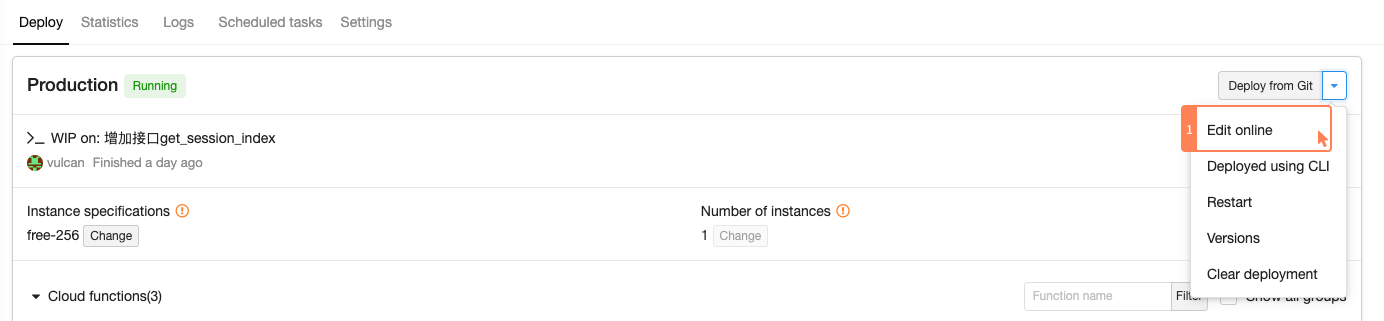
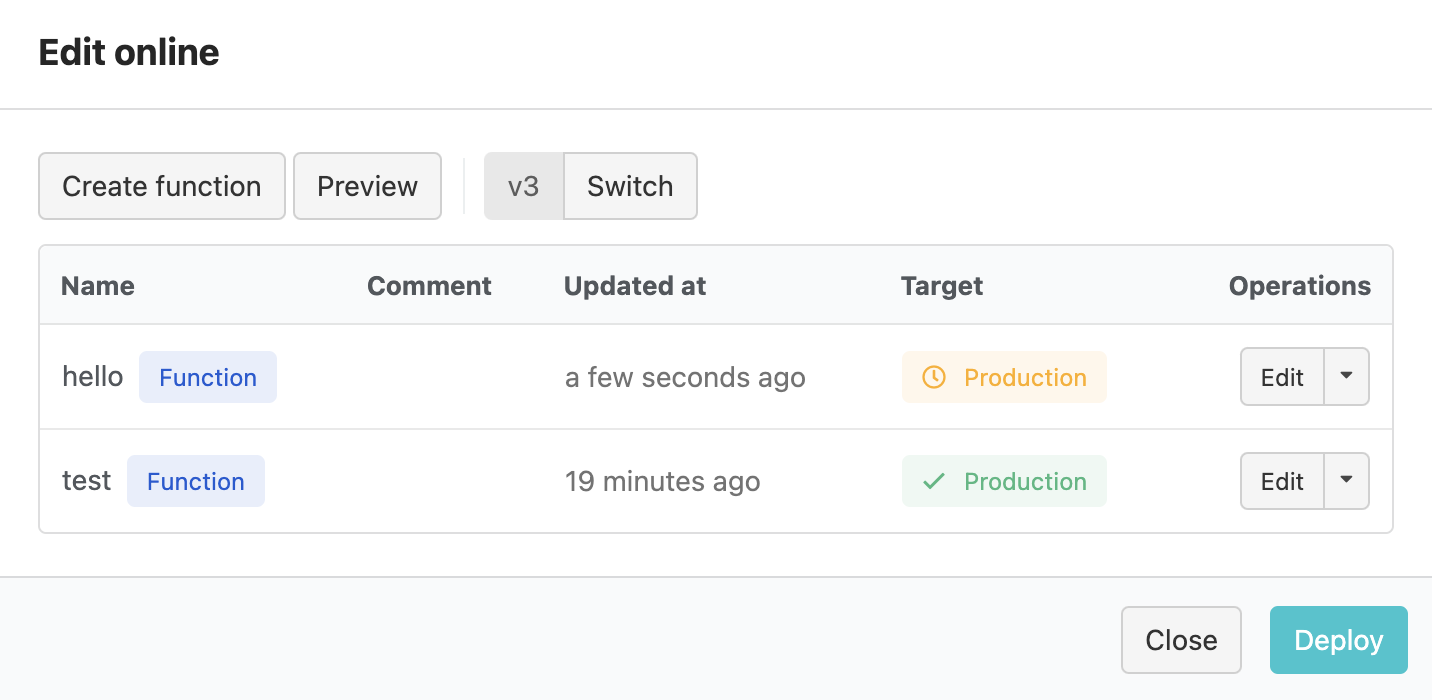
On Dashboard > LeanEngine > Manage deployment > Your group > Deploy > Edit online, you can:
- Create function: When creating a Cloud Function, you can specify its type, name, code, and comments. Click Create to save the Cloud Function. Types of Cloud Functions include Function (basic Cloud Function), Hook, and Global (shared logic used by multiple Cloud Functions).
- Deploy: You can select the environment to deploy your Cloud Functions to and click Deploy to proceed.
- Preview: This will combine all the Cloud Functions into a single code snippet. You can verify the code in your Cloud Functions or override the file named
cloud.jsin a project created from the demo project with the code shown here. - Maintain Cloud Functions: You can edit existing Cloud Functions, view histories, and delete Cloud Functions.
After you edit your Cloud Functions, make sure to click Deploy to have the edits take effect.
The online editor only supports Node.js at this time. The latest version, v3, uses Node.js 8.x and the Node.js SDK 3.x. With this version selected, you’ll need to write your functions using Promise. Packages provided by default include async, bluebird, crypto, debug, ejs, jade, lodash, moment, nodemailer, qiniu, redis, request, request-promise, superagent, underscore, uuid, wechat-api, and xml2js.
More about the SDK versions used by the online editor
| Version | Node.js SDK | JS SDK | Node.js | Notes | Dependencies available |
|---|---|---|---|---|---|
| v0 | 0.x | 0.x | 0.12 | Not recommended anymore | moment, request, underscore |
| v1 | 1.x | 1.x | 4 | async, bluebird, co, ejs, handlebars, joi, lodash, marked, moment, q, request, superagent, underscore | |
| v2 | 2.x | 2.x | 6 | Please write your functions using Promise | async, bluebird, crypto, debug, ejs, jade, lodash, moment, nodemailer, qiniu, redis, request, request-promise, superagent, underscore, uuid, wechat-api, xml2js |
| v3 | 3.x | 3.x | 8 | Please write your functions using Promise | async, bluebird, crypto, debug, ejs, jade, lodash, moment, nodemailer, qiniu, redis, request, request-promise, superagent, underscore, uuid, wechat-api, xml2js |
Upgrading from v0 to v1:
- Upgraded the JS SDK to 1.0.
- Requires you to obtain the user from
request.currentUserinstead ofAV.User.current. - Requires you to manually provide the
userobject when callingAV.Cloud.run.
Upgrading from v1 to v2:
- Upgraded the JS SDK to 2.0 (Promise must be used instead of callback).
- Removed
AV.Cloud.httpRequest. - Requires you to return a Promise from each Cloud Function and throw an
AV.Cloud.Errorfor each error.
Upgrading from v2 to v3:
- Upgraded the JS SDK to 3.0 (includes changes to the behavior of
AV.Object.toJSON).
Difference between writing Cloud Functions online and deploying a project
When you write Cloud Functions online, the way our system deals with your functions is to join them together, generate a Cloud Engine project, and deploy this project.
You can consider writing Cloud Functions online to be the same as deploying a project: they both form a complete project in the end.
When you define functions online, you can quickly generate a Cloud Engine project without using our SDK or Git.
You may also choose to create and deploy a project written based on our SDK.
The two options are mutually exclusive: when you deploy with one option, the deployment using the other option will be overridden.
Migrating from writing Cloud Functions online to deploying a project
- Install the CLI according to the CLI Guide and create a new project by running
lean new. SelectNode.js > Expressas the template (this is our demo project for Node.js). - Navigate to Dashboard > LeanEngine > Manage deployment > Your group > Deploy > Edit online and click Preview. Copy the code shown here and replace the code in
cloud.jswith it. - Run
lean up. Now you can test your Cloud Functions and hooks on http://localhost:3001. Once you’re done, runlean deployto deploy your code to Cloud Engine. If you have standard instances, make sure to runlean publishas well. - After deploying your project, watch the dashboard to see if there are any errors.
If you have been using the Node.js SDK 0.x, you’ll have to update your code to avoid compatibility issues.
For example, AV.User.current() should be changed to request.currentUser.
Viewing and Running Cloud Functions
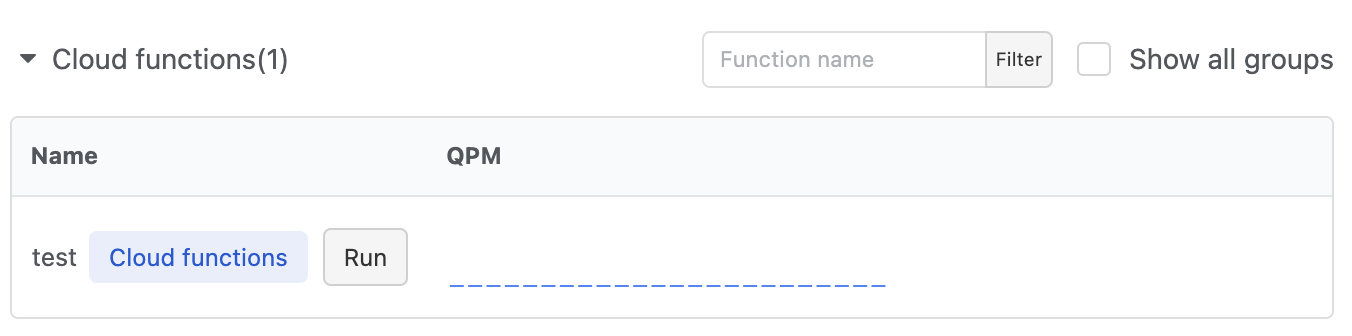
Dashboard > LeanEngine > Manage deployment > Your group > Deploy shows all the Cloud Functions and hooks defined within each group, including their names, groups, and QPM (requests per minute). You can click Run to run a Cloud Function from the dashboard.
Cloud Functions from all the groups in your application will be displayed here regardless of the way they’re deployed (writing Cloud Functions online or deploying a project).
Production Environment vs. Staging Environment
Your app comes with a production environment and a staging environment. When triggering a Cloud Function from within a Cloud Engine instance using the SDK, no matter explicitly or implicitly (by triggering hooks), the SDK will trigger the function defined in the same environment as the instance. For example, with beforeDelete defined, if an object is deleted with the SDK in the staging environment, the beforeDelete hook in the staging environment will be triggered.
When triggering Cloud Functions outside of a Cloud Engine instance using the SDK, no matter explicitly or implicitly, X-LC-Prod will be set to 1 by default, which means that the Cloud Functions in the production environment will be triggered. For historical reasons, there are some differences among the SDKs:
- For Node.js, PHP, Java, and C# SDKs, the production environment will be used by default.
- For the Python SDK, when debugging locally with lean-cli, the staging environment will be used if it exists. Otherwise, the production environment will be used.
- For Java example projects, java-war-getting-started and spring-boot-getting-started, when debugging locally with lean-cli, the staging environment will be used if it exists. Otherwise, the production environment will be used (same as the Python SDK).
You can specify the environment being used with the SDK:
- .NET
- Java
- Objective-C
- Swift
- Flutter
- JavaScript
- Python
- PHP
- Go
LCCloud.IsProduction = true; // production (default)
LCCloud.IsProduction = false; // staging
LCCloud.setProductionMode(true); // production
LCCloud.setProductionMode(false); // staging
[LCCloud setProductionMode:YES]; // production (default)
[LCCloud setProductionMode:NO]; // staging
// production by default

// staging
do {
    let environment: LCApplication.Environment = [.cloudEngineDevelopment]
    let configuration = LCApplication.Configuration(environment: environment)
    try LCApplication.default.set(
        id: {{appid}},
        key: {{appkey}},
        serverURL: "https://please-replace-with-your-customized.domain.com",
        configuration: configuration)
} catch {
    print(error)
}
LCCloud.setProduction(true); // production (default)
LCCloud.setProduction(false); // staging
AV.setProduction(true); // production (default)
AV.setProduction(false); // staging
leancloud.use_production(True) # production (default)
leancloud.use_production(False) # staging
# Needs to be called before `leancloud.init`
Client::useProduction(true); // production (default)
Client::useProduction(false); // staging
// Not supported yet (will always use the production environment)
If you’re using the trial mode, there will only be a production environment and you won’t be able to switch to the staging environment.
Scheduled Tasks
You can set up scheduled tasks to run your Cloud Functions periodically. For example, you can have your app clean up temporary data every night, send push notifications to users every Monday, etc. The time set for a scheduled task can be accurate to a second.
The timeout applied to ordinary Cloud Functions also applies to scheduled tasks. See Avoiding Timeouts for more information.
If a scheduled task triggers more than 30 400 (Bad Request) or 502 (Bad Gateway) errors within 24 hours, the task will be disabled and you will get an email regarding the issue. The error timerAction short-circuited and no fallback available will also be printed to the log.
After deploying your program to Cloud Engine, go to Dashboard > LeanEngine > Manage deployment > Your group > Scheduled tasks and click Create scheduled task to create a scheduled task for a Cloud Function. For example, if we have a function named logTimer:
- Node.js
- Python
- PHP
- Java
- .NET (C#)
- Go
AV.Cloud.define("logTimer", function (request) {
  console.log("This log is printed by logTimer.");
});
@engine.define
def logTimer(movie, **params):
    print('This log is printed by logTimer.')
Cloud::define("logTimer", function($params, $user) {
    error_log("This log is printed by logTimer.");
});
@EngineFunction("logTimer")
public static float logTimer throws Exception {
  LogUtil.avlog.d("This log is printed by logTimer.");
}
[LCEngineFunction("logTimer")]
public static void LogTimer() {
    Console.WriteLine("This log is printed by logTimer.");
}
leancloud.Engine.Define("logTimer", func(req *FunctionRequest) (interface{}, error) {
  fmt.Println("This log is printed by logTimer.")
  return nil, nil
})

You can specify the times a scheduled task gets triggered using one of the following expressions:
- CRON expression
- Interval in seconds
Take the CRON expression as an example. To print logs at 8am every Monday, create a scheduled task for the function logTimer using a CRON expression and enter 0 0 8 ? * MON for it.
See Cloud Queue Guide § CRON Expressions for more information about CRON expressions.
When creating a scheduled task, you can optionally fill in the following two fields:
- Params: The arguments passed to the Cloud Function as a JSON object.
- Error-handling policy: Whether to retry or cancel the task when it fails due to a Cloud Function timeout. See Cloud Queue Guide § Error-Handling Policy for more information.
Last execution is the time and result of the last execution. This information will only be retained for 5 minutes. Under the details of the execution:
status: The status of the task; could besuccessorfaileduniqueId: A unique ID for the taskfinishedAt: The exact time when the task finished (for succeeded tasks only)statusCode: The HTTP status returned by the Cloud Function (for succeeded tasks only)result: The response body returned by the Cloud Function (for succeeded tasks only)error: Error message (for failed tasks only)retryAt: The time the task will be rerun (for failed tasks only)
You can view the logs of all the scheduled tasks on Dashboard > LeanEngine > Manage deployment > Your group > Logs.